Wall patch kits are often marketed as quick, affordable solutions for repairing holes, dents, and cracks. For many homeowners, they seem like an easy fix that eliminates the need for professional help. However, once the repair dries and paint is applied, the patched area often stands out instead of blending seamlessly with the surrounding wall.
The reason patch kits don’t match existing walls lies in differences in materials, textures, aging, and application methods. Even when instructions are followed carefully, small inconsistencies can result in visible patches. Understanding why this happens helps homeowners set realistic expectations and choose better repair methods for long-lasting results.
Differences Between Patch Kits and Existing Wall Materials
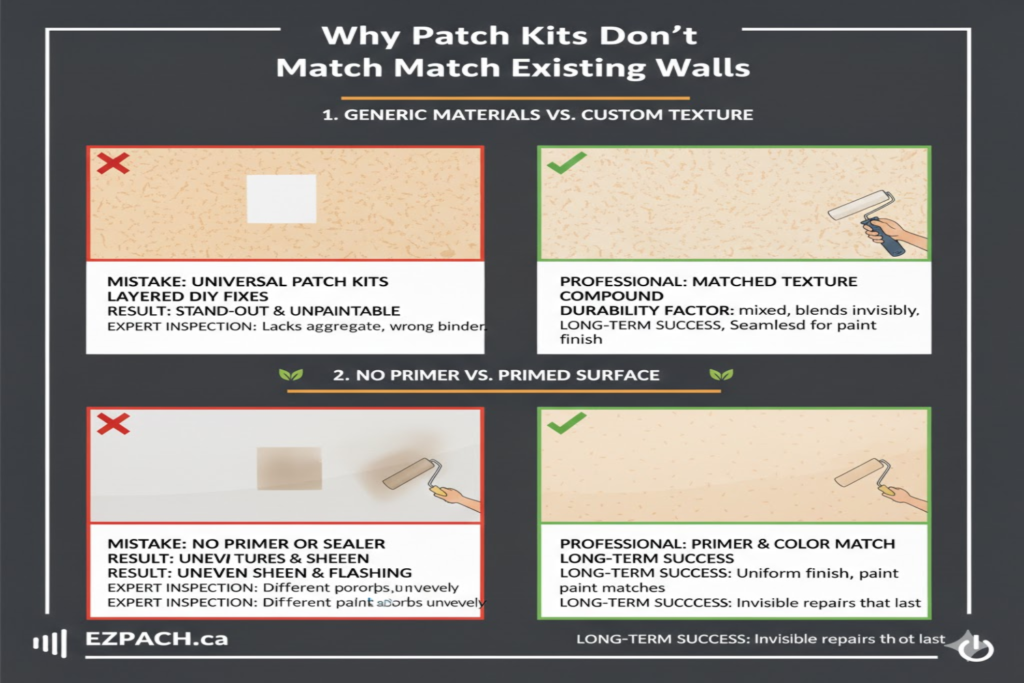
Patch kits are designed for convenience, not perfect matching. They use simplified materials meant to work across many surfaces, while existing walls have unique characteristics shaped over time.
Most walls have undergone years of settling, paint layering, humidity exposure, and surface wear. Patch kits, on the other hand, introduce fresh material with different densities, porosities, and drying behaviors. This mismatch is the primary reason repaired areas remain noticeable.
| Feature | Patch Kits | Existing Walls | Visual Impact |
| Material Composition | Lightweight spackling or filler | Plaster or drywall compound aged over the years | Patch dries smoother or chalkier |
| Surface Texture | Uniform and flat | Irregular due to age and paint layers | The patch looks overly smooth |
| Absorption Rate | High and uneven | Stabilized over time | Paint color appears different |
| Drying Behavior | Fast drying | Slow, layered curing | Patch shrinks or flashes |
| Flexibility | Limited | Adapted to wall movement | Cracks reappear around the patch |
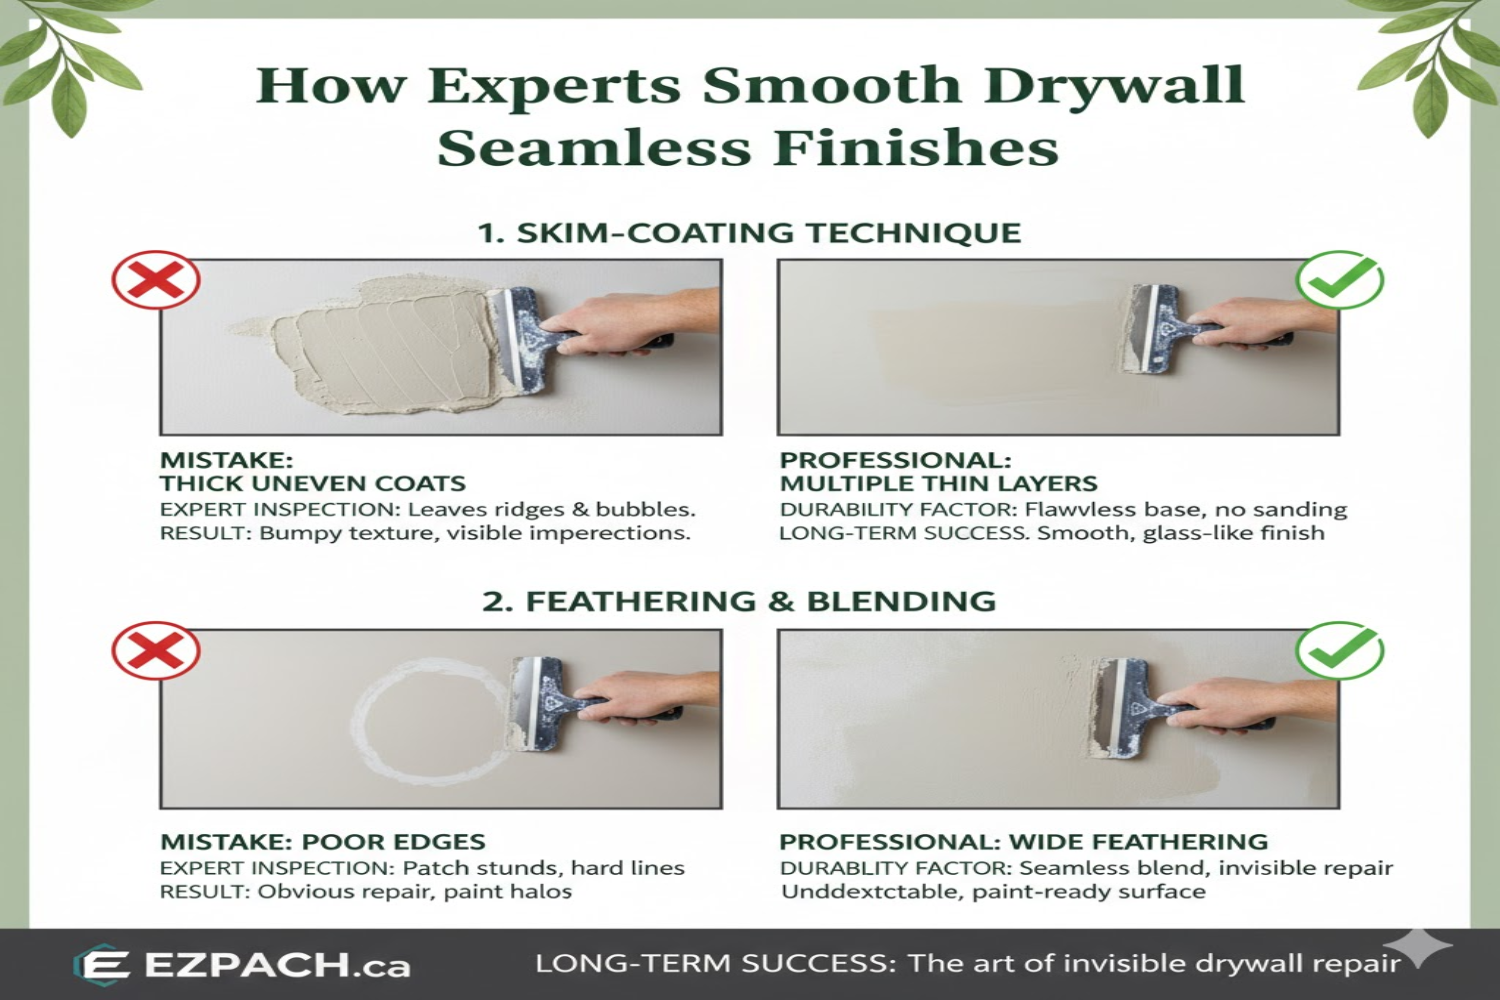
Texture Inconsistencies After Repairs
Texture mismatch is one of the most obvious reasons patch kits fail to blend. Even smooth walls are rarely truly flat when examined closely.
Smooth Walls Are Not Truly Smooth
Older walls accumulate subtle texture from repeated painting, sanding, and wear. Patch kits create a fresh, flat surface that reflects light differently, making repairs visible. This contrast becomes more noticeable under bright or angled lighting.
Textured Walls Are Hard to Replicate
Orange peel, knockdown, and popcorn textures require specialized tools and timing. Patch kits rarely include texture-matching materials, resulting in flat spots that disrupt visual continuity.
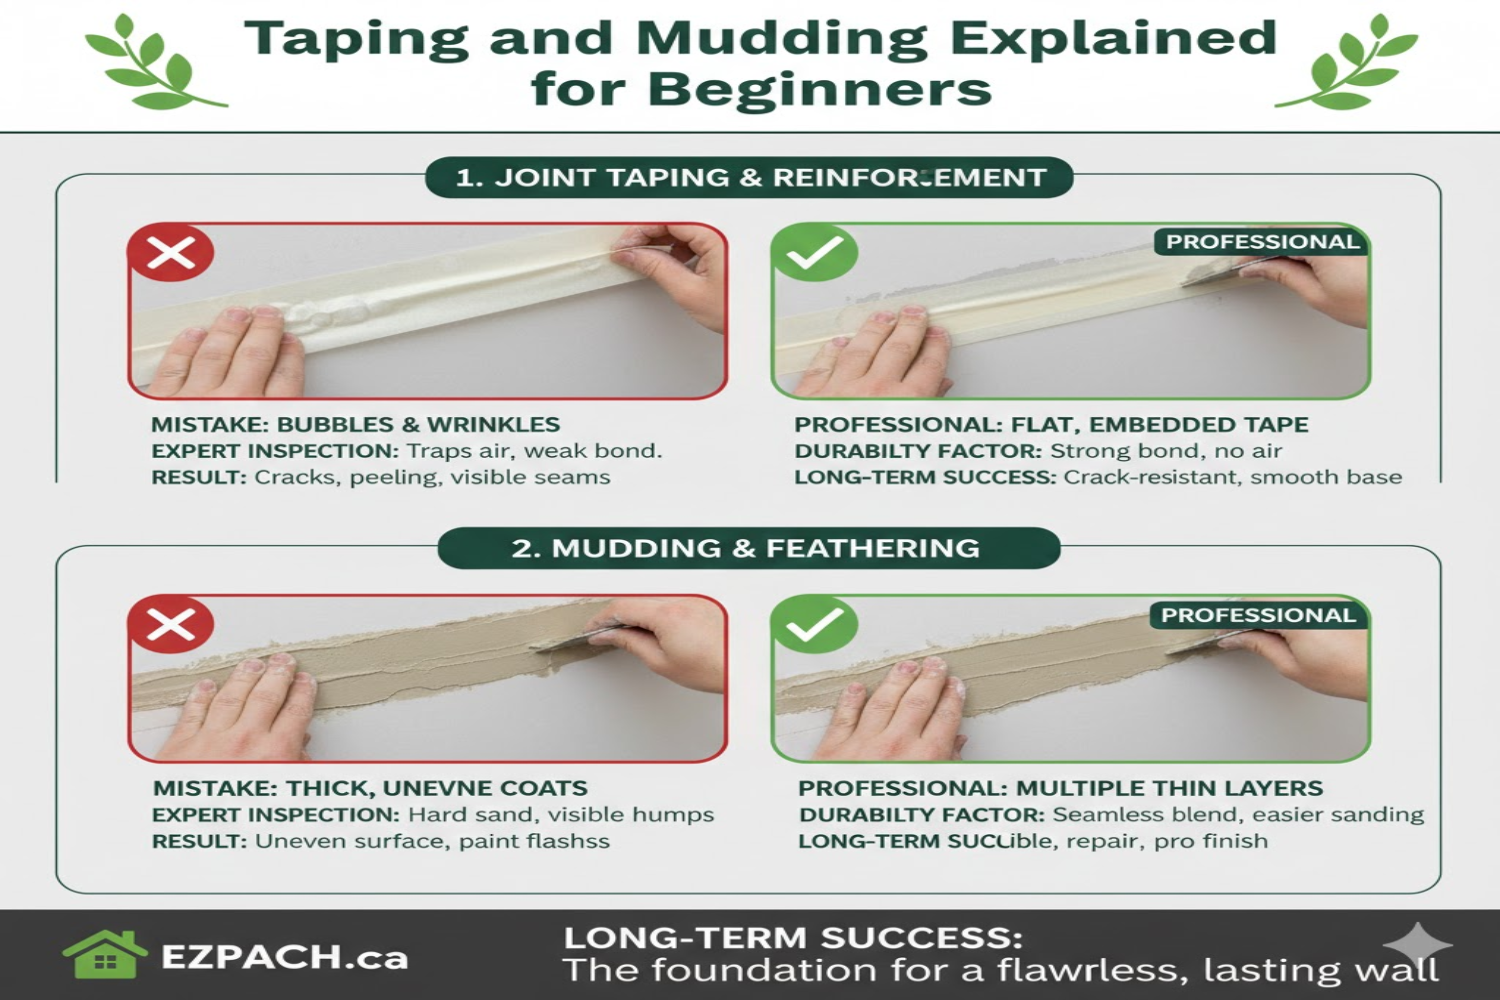
Edge Feathering Issues
Patch edges often dry harder than the surrounding areas. Without proper feathering and sanding, these edges create shadows that reveal the repair even after painting.
Paint Absorption and Color Mismatch
Even when the same paint color is used, patched areas often appear lighter or darker than the rest of the wall.
Fresh Material Absorbs Paint Differently
Patch compounds are more porous than aged walls. This causes them to absorb paint unevenly, leading to dull or “flashed” spots.
Paint Aging on Existing Walls
Walls fade and discolor slightly over time due to sunlight and cleaning. New paint over a patch doesn’t match the surrounding aged paint, even if it’s the same color.
Lack of Proper Priming
Many patch kits skip primer or recommend paint-and-primer combinations. Without a dedicated primer, patched areas absorb paint inconsistently and stand out.
Drying and Shrinkage Problems
Patch compounds often dry faster than traditional plaster or joint compound. As they dry, they shrink slightly, creating shallow depressions that become visible once painted. This shrinkage can also cause fine cracks around the patch edges.
Improper drying conditions, such as high humidity or rushed painting, further exaggerate these issues. Walls repaired with patch kits often need multiple layers and an extended drying time to reduce visibility.
Wall Movement and Structural Stress
Existing walls naturally expand and contract due to temperature and humidity changes. Patch kits are not designed to accommodate this movement.
Rigid Patch Materials
Many patch compounds dry harder than the surrounding walls. This rigidity makes them prone to cracking as the wall shifts.
Old Homes vs New Materials
In older homes, plaster walls move more than modern drywall. Patch kits lack the flexibility needed to move with aged materials.
Stress at Patch Boundaries
Movement stress concentrates where the patch meets the wall. Over time, cracks form around the repair, making it stand out again.
Application Technique Limitations
Patch kits simplify the repair process, but this simplicity often leads to poor blending.
Single-Layer Application
Many kits encourage one-step filling, but professional repairs use multiple thin layers. Single-layer patches dry unevenly and leave visible contours.
Limited Tool Quality
Plastic knives included in kits lack flexibility and precision. This makes it difficult to feather edges smoothly into the surrounding wall.
Inadequate Sanding
Patch kits often underestimate sanding requirements. Without gradual sanding and blending, patched areas remain raised or overly smooth.
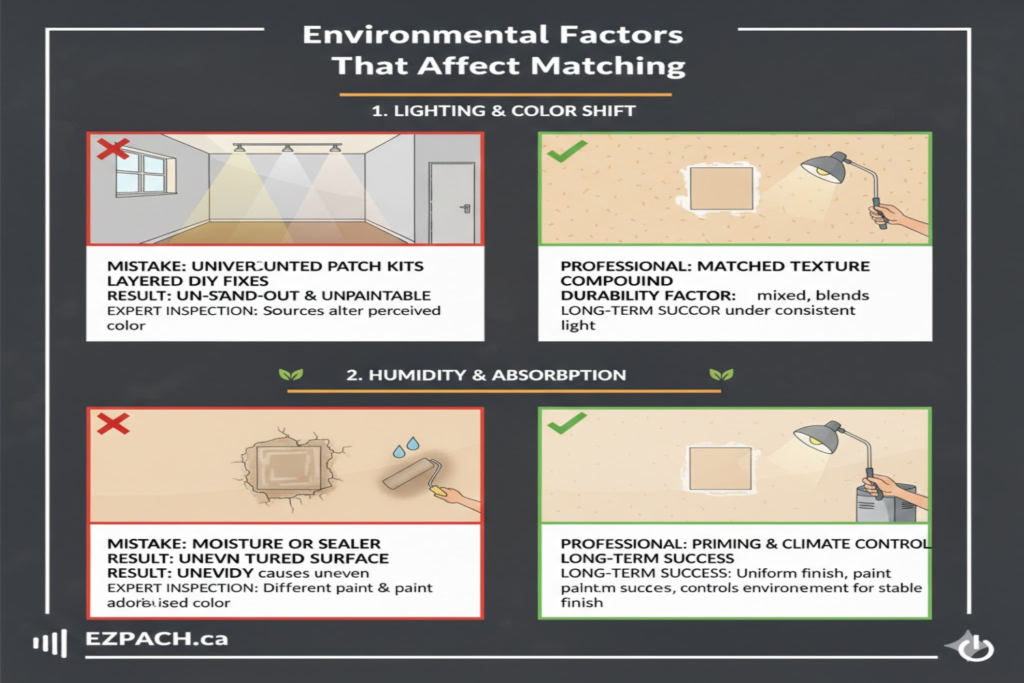
Environmental Factors That Affect Matching
Environmental conditions during and after repair can worsen mismatches.
- Humidity affects drying speed and surface hardness
- Temperature changes alter shrinkage rates
- Poor ventilation traps moisture under the patch
- Direct sunlight highlights surface differences
- Seasonal wall movement reopens patch edges
When Patch Kits Work Best
Patch kits are not always a bad choice, but their limitations must be understood.
They work best for very small nail holes, low-visibility areas, or temporary repairs. In high-traffic or well-lit spaces, professional methods produce far better results.
Understanding where patch kits succeed helps homeowners avoid disappointment and unnecessary rework.
Better Alternatives to Patch Kits
- Use traditional joint compound applied in thin layers
- Prime patched areas separately before painting
- Match texture manually using spray or trowel techniques
- Feather edges wider than the damaged area
- Allow full drying and curing time before finishing
FAQs
1. Why does my patch look shiny after painting?
Patch compounds absorb paint differently, causing flashing that reflects light unevenly.
2. Can sanding fix patch kit mismatches?
Sanding helps, but it won’t fully correct material and absorption differences.
3. Should I prime before painting a patch?
Yes, priming seals the patch and helps paint blend more evenly.
4. Why does the patch crack after a few months?
Patch kits are rigid and can’t adapt to wall movement over time.
5. Do patch kits work better on drywall or plaster?
They work slightly better on drywall but still struggle to match aged surfaces.
6. Why does texture look flatter on patched areas?
Patch kits lack texture-matching materials and tools.
7. Can multiple paint coats hide a patch?
Extra coats help slightly, but usually don’t eliminate visible differences.
8. Are professional repairs always invisible?
While no repair is perfect, professionals achieve much better blending through layering and texture matching.
Conclusion
Patch kits don’t match existing walls because they introduce new materials into aged, textured, and environmentally adapted surfaces. Differences in texture, paint absorption, drying behavior, and flexibility all contribute to visible repairs. While patch kits offer convenience, they sacrifice precision and long-term durability.
Understanding why patch kits fail to blend allows homeowners to choose better repair methods. Using proper materials, applying thin layers, priming correctly, and respecting drying times significantly improve results. When appearance matters, professional repair techniques remain the most reliable way to achieve seamless walls.
Drywall Repair Halifax
EZ Patch offers clean, professional drywall, ceiling, plaster, and water damage repair services in Halifax with minimal mess and long-lasting results.
EZ Patch – Drywall Repair Experts
Trusted drywall repair professionals serving Halifax and nearby areas.
Drywall Patch & Repair
Seamless drywall repairs for holes, cracks, dents, and damaged walls.
Ceiling Repairs
Professional ceiling repair services for stains, cracks, and water damage.
Drywall Installation
Complete drywall installation services for renovations and new builds.
Taping & Mudding
Smooth, paint-ready wall finishes by expert drywall finishers.
Plaster Repair Experts
Precision plaster repair services while maintaining original wall texture.
Water Damage Repair
Drywall and ceiling restoration for properties affected by water damage.
Texture Matching
Accurate texture blending so repaired areas match existing finishes.
Installation, Repair & Removal
End-to-end drywall installation, repair, and removal solutions.