Taping and mudding are essential skills in drywall installation and repair. They involve joining drywall sheets seamlessly, creating a smooth surface ready for painting or finishing. For beginners, understanding the basics of taping and mudding ensures professional-looking walls without cracks or imperfections.
Mastering taping and mudding requires patience and practice. Each step, from applying joint tape to finishing multiple layers of joint compound, contributes to the overall durability and appearance of your walls. Even small mistakes can result in visible lines, so learning the correct techniques early on is vital for successful drywall projects.
Understanding Taping and Mudding
Taping refers to the process of applying drywall tape over the seams between drywall panels. This tape reinforces joints and prevents cracking, while mudding, or applying joint compound, smooths out the surface. Together, these steps create a flawless wall finish.
Beginners often confuse taping and mudding, but they are distinct yet complementary processes. While taping focuses on strength and coverage of seams, mudding focuses on creating a visually smooth finish that can be painted. Understanding both is key to successful drywall work.
Types of Drywall Tape
There are several types of drywall tape used in taping and mudding projects, each with specific benefits and applications.
Paper Tape
Paper tape is strong and widely used for inside corners and flat seams. It is folded along the corners for precise alignment. Proper embedding with joint compound ensures long-lasting joints.
Mesh Tape
Mesh tape is self-adhesive and ideal for beginners due to its easy application. It is especially useful for repairing small cracks and uneven walls. However, it may not be as strong as paper tape for large seams.
Fiberglass Tape
Fiberglass tape is durable and resistant to cracking. It is best for high-stress areas like ceilings or exterior walls. Beginners should combine it with joint compound carefully to avoid bubbling.
Essential Tools for Beginners
To succeed in taping and mudding, you need the right tools. Using improper tools can result in uneven surfaces or damaged drywall.
- Taping knife: Essential for spreading joint compound smoothly.
- Mud pan: Holds the joint compound while working on seams.
- Corner trowel: Helps finish inside and outside corners neatly.
- Sandpaper or sanding block: Smooths dried compound for a flawless finish.
- Joint compound: The mud used to fill seams and cover tape.
Preparing Drywall for Taping and Mudding
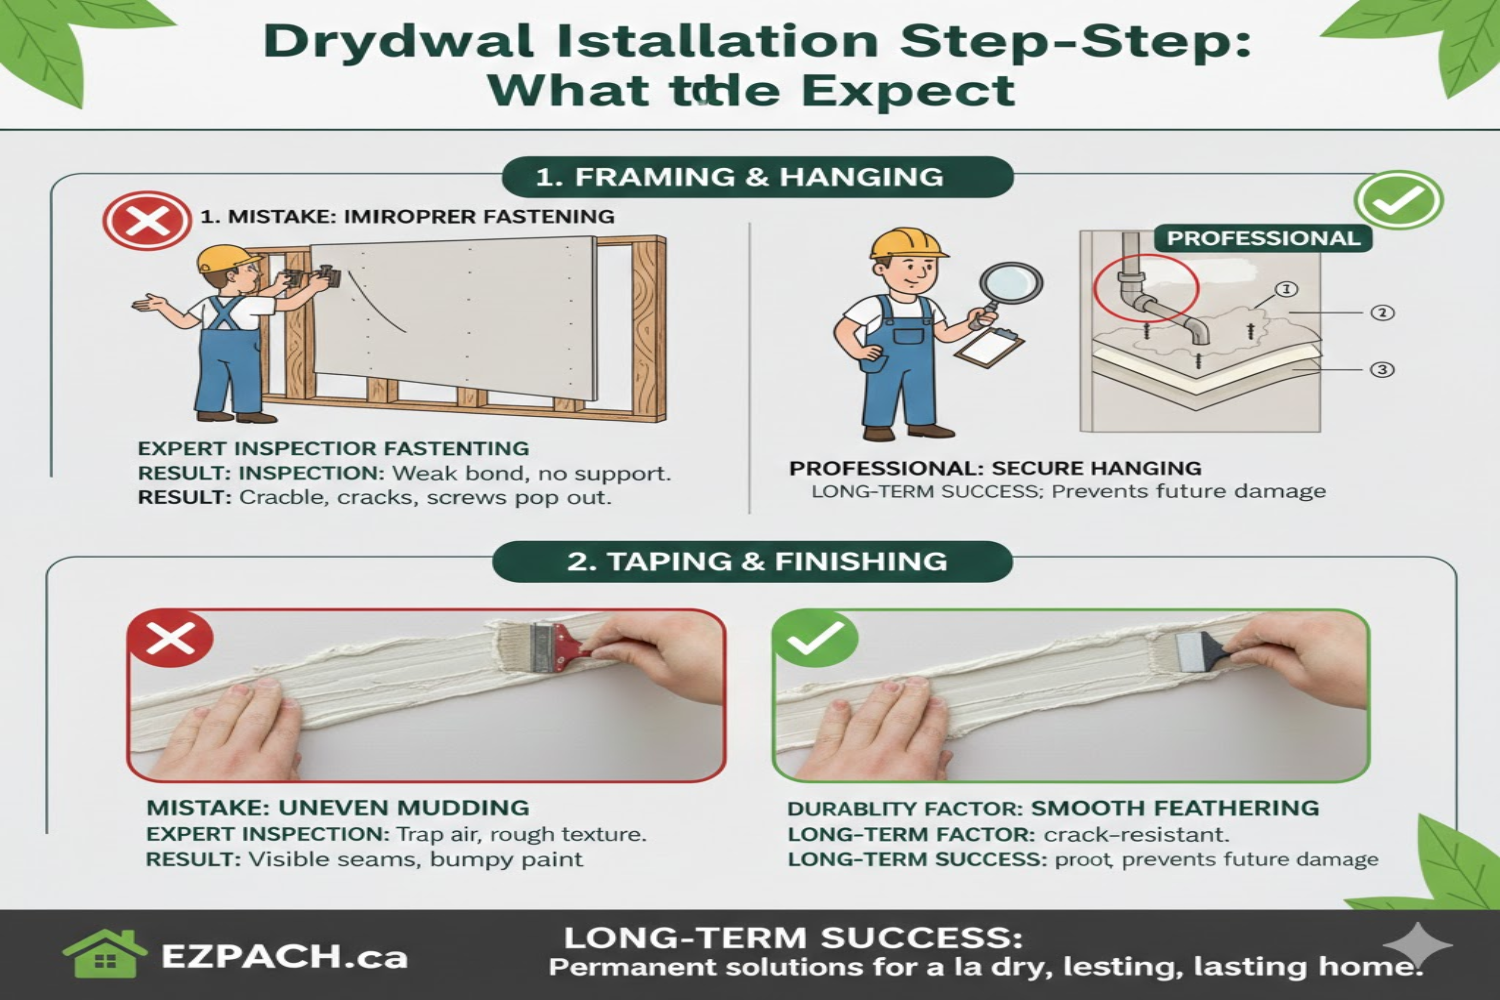
Before applying tape and mud, proper preparation ensures better adhesion and a smoother finish. Clean the surface of dust, debris, and excess screws. Gaps larger than 1/4 inch should be filled with a backing compound to prevent cracking.
Priming new drywall isn’t always necessary, but lightly dampening paper tape areas can help prevent bubbles. Ensure screws and nails are slightly recessed below the drywall surface to allow even mud application. Taking the time to prepare the surface makes the taping and mudding process much easier and effective.
Step-by-Step Taping Process
Step 1: Cutting and Positioning Tape
Measure the seam and cut the tape slightly longer than the joint. For paper tape, fold it along the corners for the inside angles. Mesh tape is self-adhesive and applied directly to the seam.
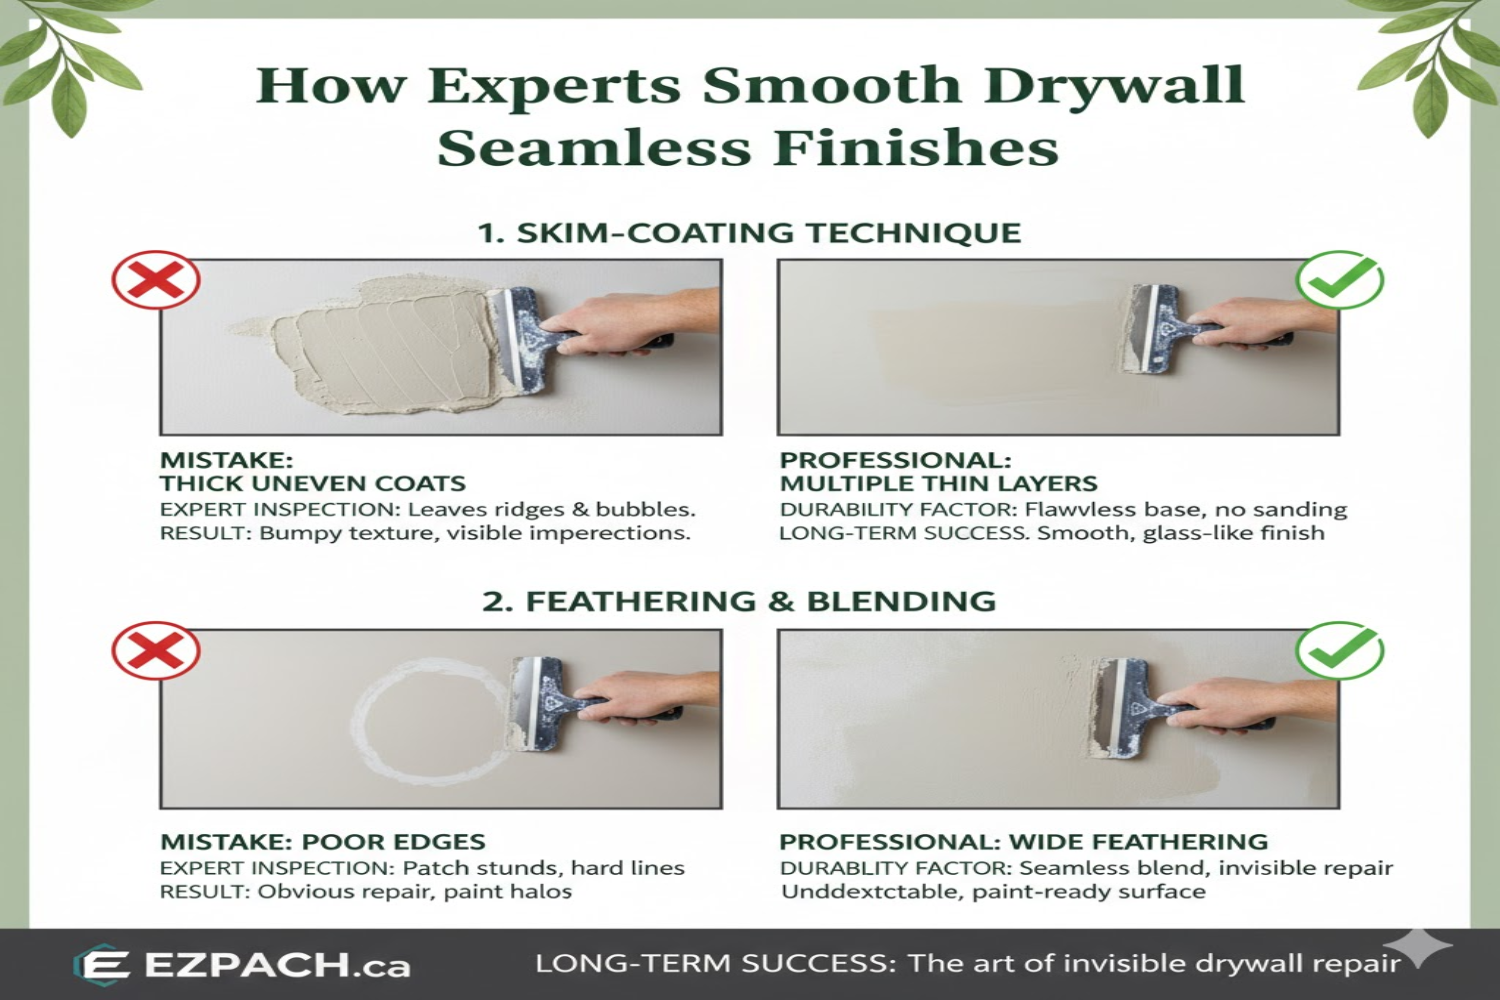
Step 2: Applying the First Coat of Mud
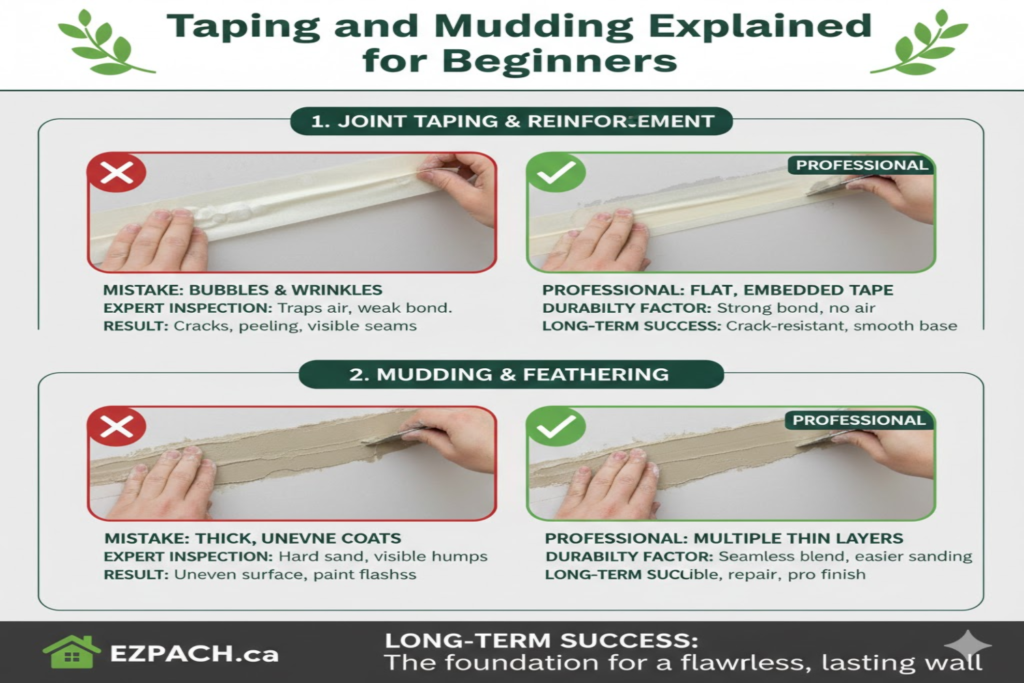
Use a taping knife to spread a thin layer of joint compound over the seam. Embed the tape into the mud while smoothing out bubbles. Press the tape firmly into the mud for strong adhesion.
Step 3: Smoothing Seams
After embedding, remove excess mud to create an even surface. Feather the edges for a seamless transition to the drywall. Allow the compound to dry completely before applying the next coat.
Step 4: Applying Additional Coats
Apply at least two more coats of joint compound over the tape. Each coat should be slightly wider than the previous one. Sand between coats lightly to remove bumps and ridges.
Mudding Techniques for Beginners
Mudding requires patience and attention to detail. The goal is a smooth wall surface ready for painting.
- Troweling: Use a wide trowel to spread compound evenly across seams.
- Feathering: Extend the edges of mud beyond the tape to blend with the wall.
- Corner finishing: Use a corner trowel to smooth inside and outside corners.
- Sanding: Lightly sand each dried coat for a polished finish.
Proper mudding prevents visible seams and cracks. Beginners should practice spreading thin, even layers for the best results.
Common Mistakes and How to Avoid Them
Even minor errors in taping and mudding can lead to noticeable flaws. Here’s how to prevent them:
Applying Too Much Compound
Using excessive joint compound can lead to cracks and uneven surfaces. Apply thin layers and let each dry completely before adding more.
Not Embedding Tape Properly
Failing to press tape into the mud can cause bubbling and separation. Ensure the tape is fully embedded and smooth before drying.
Rushing Drying Time
Skipping proper drying time can cause cracking when sanding or applying additional coats. Allow each coat to dry thoroughly, usually 12-24 hours.
Insufficient Sanding
Not sanding between coats leaves ridges and bumps. Light sanding after each coat ensures a smooth, paint-ready surface.
Finishing Touches and Sanding
Sanding is critical for a professional finish. Use fine-grit sandpaper to smooth dried mud. Always wear a mask to avoid inhaling drywall dust. Inspect corners and seams carefully, touching up any uneven areas. After sanding, your wall is ready for primer and paint.
Tools for Finishing
- Sanding block
- Pole sander for high areas
- Soft brush to remove dust
Tips for a Smooth Finish
- Lightly dampen sandpaper for less dust.
- Avoid over-sanding, which exposes the tap.
- Check seams in bright light for imperfections.
Repairing Cracks and Imperfections
Even completed walls may develop minor cracks. Repairing them early prevents worsening damage.
- Apply a thin layer of joint compound over the crack.
- Press mesh or paper tape over the repair
- Feather edges to blend with the wall
- Sand smooth and recoat if necessary.
- Prime before painting
Small cracks around seams often result from improper embedding or drying too quickly. Regular inspection helps maintain wall integrity.
Tips for Efficient Taping and Mudding
Efficiency in taping and mudding improves both the quality and speed of your drywall work. Preparing materials, organizing your workspace, and following proper techniques help beginners achieve professional results without frustration. Small adjustments in method can make a big difference in achieving smooth, crack-free walls.
- Keep joint compound at the right consistency for easy spreading and minimal waste.
- Work in small, manageable sections to maintain control and avoid rushed mistakes.
- Use bright lighting to spot uneven areas and seams that need extra attention.
- Always clean your tools between coats to ensure smooth application.
- Plan your workflow, starting from the corners and moving outward, for consistent results.
Key Benefits of Proper Taping and Mudding
- Creates smooth, paint-ready walls
- Prevents seam cracks and structural weaknesses
- Improves the longevity of drywall installation
- Enhances the aesthetic appeal of interiors
- Reduces the need for frequent wall repairs
Conclusion
Taping and mudding are foundational skills for anyone working with drywall. With practice, beginners can achieve seamless walls that look professionally finished. Understanding the process, using the right tools, and following step-by-step methods ensures durable and visually appealing results.
Patience and attention to detail are key to mastering taping and mudding. Avoiding common mistakes, properly sanding, and finishing corners correctly make a significant difference. With these techniques, your walls will not only look flawless but also last longer, saving time and money on future repairs.
Frequently Asked Questions (FAQs)
1. Can beginners use mesh tape instead of paper tape?
Yes, mesh tape is easier to apply and reduces bubble formation. Paper tape is stronger for large seams.
2. How long does joint compound take to dry?
Typically, 12-24 hours depending on thickness and humidity. Drying time affects sanding and subsequent coats.
3. Can I paint immediately after mudding?
No, the wall must be sanded smooth and dry before priming. Painting too early can cause peeling.
4. What grit sandpaper is best for mudding?
Fine-grit (120-150) is recommended for smooth finishing. Coarser grit may damage tape.
5. How many coats of mud are required?
Usually, three coats ensure a seamless finish. Each coat should be slightly wider than the previous.
6. Do I need a corner trowel for inside corners?
It helps create sharp, professional edges. Beginners can use a taping knife if careful.
7. Can I reuse leftover joint compound?
Yes, if stored in an airtight container. Dried or crusty mud cannot be reused.
8. How to avoid cracks in corners?
Embed tape properly and apply thin, even coats. Allow sufficient drying time between coats.
Drywall Repair Halifax
EZ Patch offers clean, professional drywall, ceiling, plaster, and water damage repair services in Halifax with minimal mess and long-lasting results.
EZ Patch – Drywall Repair Experts
Trusted drywall repair professionals serving Halifax and nearby areas.
Drywall Patch & Repair
Seamless drywall repairs for holes, cracks, dents, and damaged walls.
Ceiling Repairs
Professional ceiling repair services for stains, cracks, and water damage.
Drywall Installation
Complete drywall installation services for renovations and new builds.
Taping & Mudding
Smooth, paint-ready wall finishes by expert drywall finishers.
Plaster Repair Experts
Precision plaster repair services while maintaining original wall texture.
Water Damage Repair
Drywall and ceiling restoration for properties affected by water damage.
Texture Matching
Accurate texture blending so repaired areas match existing finishes.
Installation, Repair & Removal
End-to-end drywall installation, repair, and removal solutions.