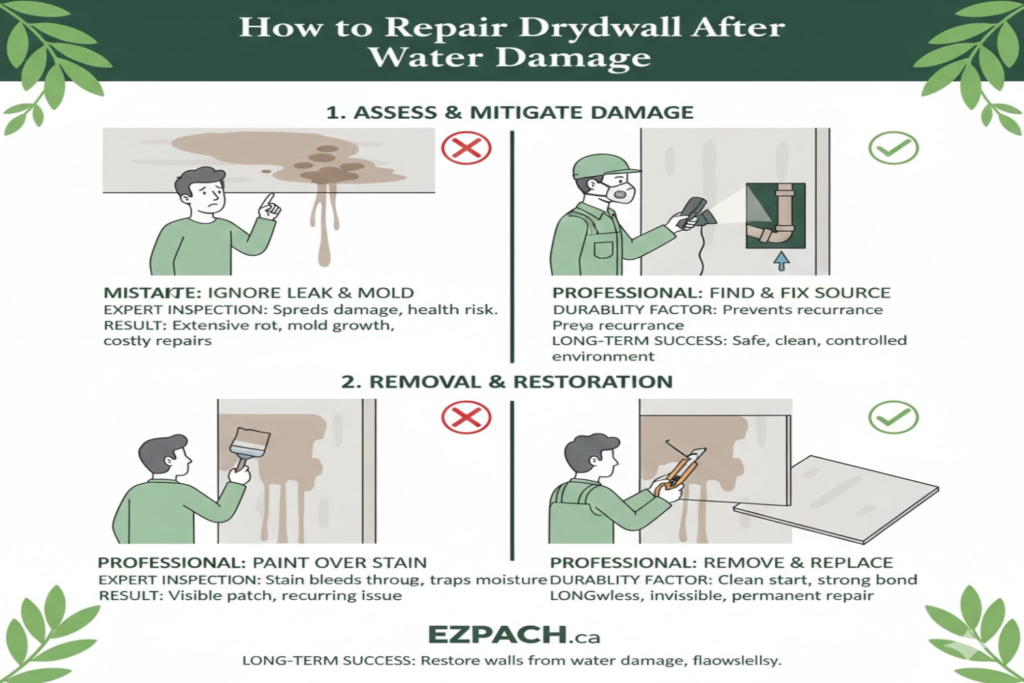
Water damage can quickly compromise the structural integrity and appearance of your home. Drywall, being a primary component of walls and ceilings, is especially vulnerable to moisture, leading to warping, sagging, or even mold growth. Knowing how to repair drywall after water damage is essential to maintain both safety and aesthetics in your home.
When water infiltrates walls or ceilings, it can cause long-term problems if not addressed promptly. From slow leaks behind appliances to sudden pipe bursts, moisture can deteriorate drywall faster than most homeowners expect. Repairing it correctly not only restores your home’s appearance but also prevents further issues like mold and mildew infestations, which can be hazardous to your health.
How to Repair Drywall After Water Damage
Repairing drywall afterwater damage involves a systematic approach, depending on the severity of the damage. Minor water spots or soft patches can often be treated with simple drying and patching techniques. However, extensive damage may require full replacement of the affected drywall sections.
Water-damaged drywall can weaken and crumble, so identifying the affected areas is critical before starting repairs. Using the right tools and materials, including joint compound, drywall tape, and replacement panels, ensures a durable repair. Professional-grade solutions may be necessary for large or persistent leaks to avoid repeated damage.
How to Identify Water-Damaged Drywall Early
Detecting water damage early can save homeowners significant repair costs and prevent mold growth. Signs such as discoloration, bubbling, or peeling paint indicate moisture intrusion behind your walls. Damp spots often feel cooler or softer than surrounding areas and may have a musty odor.
In addition, structural changes like sagging ceilings or warped walls are more severe indicators. Early identification allows you to act before the damage spreads, minimizing replacement needs and maintaining the safety of your living spaces. Homeowners should also inspect areas around plumbing, windows, and roofs regularly.
Visual Inspection Tips
- Check walls and ceilings for discoloration or dark patches.
- Look for peeling paint or wallpaper.
- Inspect baseboards and corners for swelling.
Physical Signs of Damage
- Press lightly on walls to detect soft spots.
- Check for sagging ceilings.
- Monitor areas near bathrooms and kitchens closely.
Odor-Based Detection
- Musty smells often indicate hidden moisture.
- Pay attention to the basement and attic areas.
- Persistent damp odors should prompt further inspection.
Causes of Water Damage in Walls and Ceilings
Water damage in drywall often results from a range of factors, both internal and external. Plumbing leaks, roof leaks, and faulty gutters are among the most common causes. Heavy rainfall can exacerbate these issues, leading to water seeping into walls and ceilings.
Appliance malfunctions, such as washing machine or dishwasher leaks, also contribute significantly to interior water damage. In some cases, condensation in poorly ventilated rooms can saturate drywall over time. Identifying the source of moisture is vital to ensure that repairs are long-lasting.
Plumbing Issues
- Burst pipes or loose fittings cause sudden damage.
- Slow leaks behind walls may go unnoticed.
- Old plumbing systems are more prone to failures.
Roof and Ceiling Leaks
- Damaged shingles or flashing allows water entry.
- Leaks near chimneys or vents are common.
- Ice dams in winter can worsen ceiling leaks.
Condensation and Humidity
- Poor ventilation traps moisture.
- Bathrooms, kitchens, and basements are high-risk.
- Persistent humidity weakens drywall fibers.
How to Repair Drywall After Water Damage Ceiling
Repairing a water-damaged ceiling requires extra care due to gravity and accessibility challenges. First, remove any sagging or saturated drywall to prevent collapse. Using safety equipment, such as a ladder and goggles, is essential.
After removal, inspect the joists for moisture and mold growth. Replace damaged drywall panels with new sheets, ensuring they are securely fastened. Joint compound and tape will seal the seams, while sanding and painting restore a smooth, even finish.
Safety Precautions
- Wear goggles and a dust mask to avoid debris.
- Ensure the area below is cleared of furniture.
- Use a stable ladder to access ceiling areas safely.
Ceiling Preparation
- Remove all damaged drywall sections.
- Check for hidden water sources or leaks.
- Dry the exposed joists thoroughly before replacement.
Finishing Touches
- Apply joint tape and compound to seams.
- Sand the surface after drying for smoothness.
- Prime and paint the ceiling for a finished look.
What You Should Know Before Repairing Water-Damaged Drywall
Before beginning repairs, assess the extent of damage and potential hazards. Mold presence is a serious concern; protective equipment such as gloves and masks is recommended. It is also essential to locate and fix the source of water to prevent recurrence.
Choosing the right drywall type for repairs is crucial—moisture-resistant drywall is preferred in areas prone to water exposure. Proper ventilation during and after repairs ensures that the new drywall dries thoroughly, preventing mold and sagging.
Key Points to Consider Before Repair:
- Ensure the water source is completely fixed.
- Check for mold growth and treat if necessary.
- Choose moisture-resistant drywall for high-risk areas.
- Maintain proper ventilation during repair.
- Inspect insulation for water damage.
Step-by-Step Guide to Fixing Water-Damaged Drywall
Repairing drywall requires a structured approach to ensure lasting results. Follow these steps for effective restoration:
Step 1 – Identify Damage
- Examine walls and ceilings for soft spots or discoloration.
- Mark affected areas with a pencil or tape.
- Remove any loose paint or wallpaper in the area.
Step 2 – Remove Damaged Drywall
- Cut out the affected section with a utility knife.
- Ensure you remove all soft and wet drywall.
- Dispose of debris safely to avoid contamination.
Step 3 – Dry the Area
- Use fans or dehumidifiers to dry exposed studs.
- Check for hidden moisture behind walls.
- Allow sufficient drying time before replacement.
Step 4 – Install New Drywall
- Cut a new drywall piece to fit the removed area.
- Secure the panel with screws into the studs.
- Ensure the edges align smoothly with the surrounding drywall.
Step 5 – Apply Joint Compound and Tape
- Cover seams with joint tape.
- Apply joint compound evenly over seams and screw holes.
- Let dry and sand smooth.
Step 6 – Prime and Paint
- Prime the repaired area to seal the surface.
- Apply matching paint for a uniform look.
- Inspect for uneven spots and touch up if necessary.
Drywall Water Damage Repair Cost
Repairing water-damaged drywall can vary depending on the extent and location of the damage. Minor repairs may cost around $50–$150 per wall section, while full ceiling replacements can reach $500–$1,500. Labor, materials, and additional treatments for mold remediation influence the final cost.
Cost Comparison Table:
| Repair Type | Material Cost | Labor Cost | Total Estimated Cost |
| Small Wall Patch (1–4 sq ft) | $10–$20 | $40–$80 | $50–$100 |
| Medium Wall Section (5–10 sq ft) | $20–$40 | $100–$200 | $120–$240 |
| Ceiling Repair (10–20 sq ft) | $50–$100 | $200–$400 | $250–$500 |
| Full Wall Replacement | $100–$200 | $300–$600 | $400–$800 |
| Mold-Infested Area | $50–$150 | $200–$500 | $250–$650 |
Tips to Prevent Future Water Damage in Your Home
Preventing water damage is crucial to maintaining your drywall and home’s structural integrity. Routine maintenance and awareness are key strategies. Regularly inspect plumbing, roof, and gutters for signs of leaks or damage.
Installing proper ventilation in moisture-prone areas, such as bathrooms and kitchens, can significantly reduce condensation. Moisture-resistant drywall in these areas further enhances protection. Additionally, using dehumidifiers in basements or humid climates can prevent long-term water accumulation.
- Inspect plumbing and roof regularly.
- Install moisture-resistant drywall in vulnerable areas.
- Maintain gutters and downspouts to prevent leaks.
- Use dehumidifiers in damp environments.
- Ventilate bathrooms and kitchens properly.
Conclusion
Repairing drywall after water damage requires careful planning, proper materials, and attention to detail. Acting promptly when damage is detected minimizes further deterioration and mold growth. Following a step-by-step approach ensures that repairs are durable and visually appealing.
Preventing future water damage is equally important, involving routine inspections, proper ventilation, and moisture-resistant materials. By maintaining vigilance and addressing leaks early, homeowners can protect their investment and enjoy a safe, comfortable living environment. Regular maintenance combined with timely repairs guarantees that your walls and ceilings remain in excellent condition for years to come.
FAQs
1. Can I repair water-damaged drywall myself?
Yes, minor damage can be repaired with DIY methods, including cutting out soft areas and applying joint compound. However, extensive damage or mold requires professional help.
2. How long does it take to repair drywall after water damage?
Small patches may take a few hours to dry and finish, while larger sections or ceilings may take several days. Drying time is crucial to prevent mold.
3. Is mold testing necessary after drywall water damage?
If you see visible mold or smell a musty odor, mold testing is recommended to identify contamination levels. Early testing ensures proper remediation.
4. What type of paint is best for repairing drywall?
Use moisture-resistant or mold-resistant primers and paints for areas prone to humidity. These products protect against future water damage.
5. How do I know if drywall needs full replacement?
If drywall is sagging, crumbling, or extensively discolored, full replacement is safer than patching. Soft spots indicate structural compromise.
6. Can ceiling drywall be repaired without removing the entire panel?
Yes, small areas can be patched, but larger sagging sections should be removed to ensure safety and long-term durability.
7. Does insurance cover water-damaged drywall?
Most homeowner insurance policies cover sudden water damage, but not gradual leaks or negligence. Always check your policy for specific coverage.
8. Are there any eco-friendly options for drywall repair?
Yes, recycled drywall products and low-VOC joint compounds are available, reducing environmental impact while maintaining quality.
Drywall Repair Halifax
EZ Patch offers clean, professional drywall, ceiling, plaster, and water damage repair services in Halifax with minimal mess and long-lasting results.
EZ Patch – Drywall Repair Experts
Trusted drywall repair professionals serving Halifax and nearby areas.
Drywall Patch & Repair
Seamless drywall repairs for holes, cracks, dents, and damaged walls.
Ceiling Repairs
Professional ceiling repair services for stains, cracks, and water damage.
Drywall Installation
Complete drywall installation services for renovations and new builds.
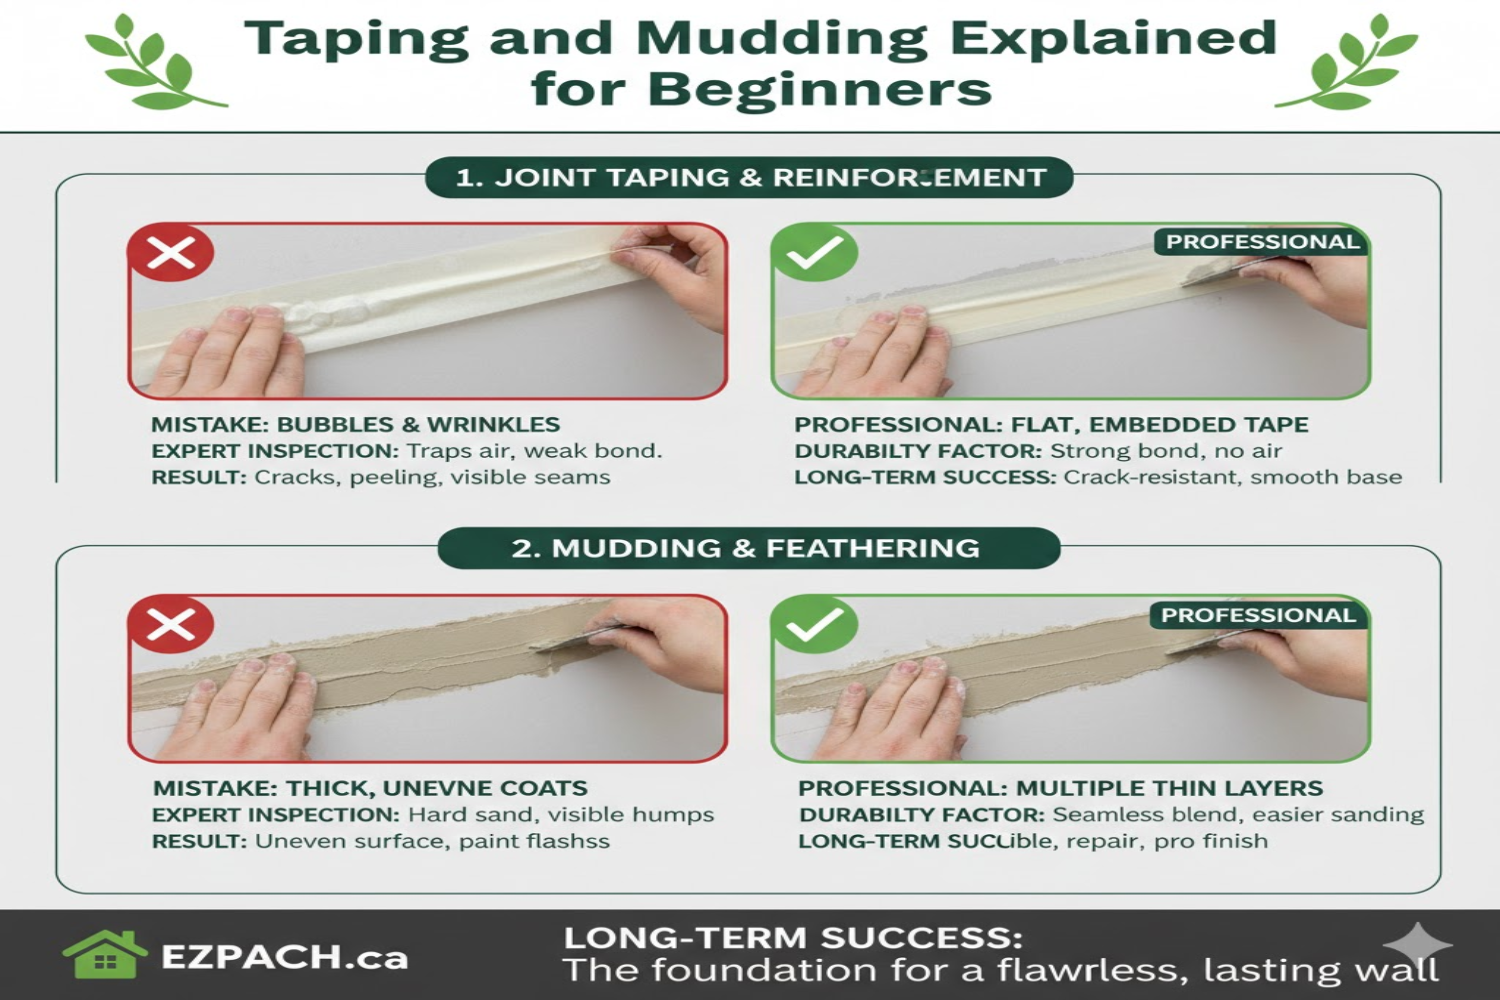
Taping & Mudding
Smooth, paint-ready wall finishes by expert drywall finishers.
Plaster Repair Experts
Precision plaster repair services while maintaining original wall texture.
Water Damage Repair
Drywall and ceiling restoration for properties affected by water damage.
Texture Matching
Accurate texture blending so repaired areas match existing finishes.
Installation, Repair & Removal
End-to-end drywall installation, repair, and removal solutions.