French Country texture is a timeless wall finish that adds warmth, elegance, and rustic charm to any interior space. It combines soft, natural textures with subtle color variations, evoking the cozy and inviting ambiance of French countryside homes. This decorative technique has become increasingly popular among homeowners, interior designers, and DIY enthusiasts who want to give walls a sophisticated yet relaxed appeal.
Mastering French Country texture requires understanding the materials, tools, and application methods that produce its signature look. When done correctly, it can transform a plain wall into a centerpiece that reflects both artistry and tradition. Using proper techniques also ensures durability, so the texture remains beautiful for years without peeling or cracking.
Understanding French Country Texture
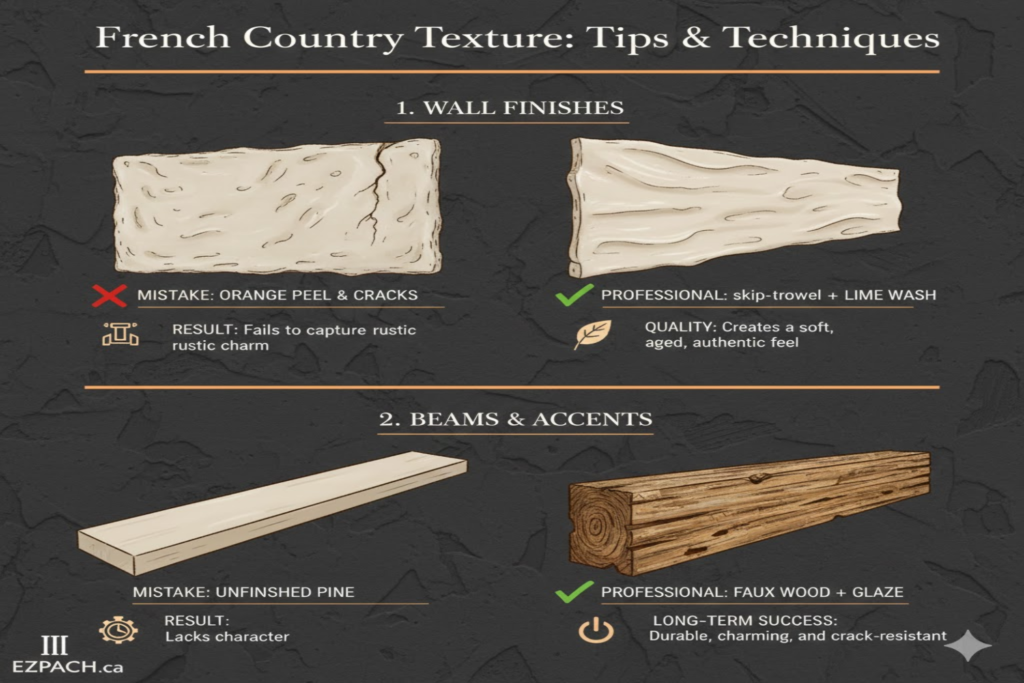
French Country texture is characterized by soft plaster-like finishes, gentle ridges, and slightly uneven surfaces that reflect light naturally. Unlike flat wall finishes, this technique adds depth and interest, creating a warm, inviting atmosphere.
Achieving this texture involves layering materials such as joint compound, Venetian plaster, or specialty textured paints. The goal is not perfection but controlled irregularity that adds character and charm. With the right preparation, tools, and techniques, even beginners can achieve professional-looking results.
Key Features of French Country Texture
French Country walls often feature subtle ridges, swirls, and irregular patterns. The texture creates a soft play of light and shadow, adding depth to the room. Color washes or glazes are often applied to enhance the rustic, aged look.
Popular Materials
Common materials include joint compound, plaster, and textured paints. Some finishes combine multiple materials to create a layered effect. Choosing the right material affects both texture and appearance, and durability.
Choosing the Right Tools
Trowels, sponges, brushes, and specialty rollers are frequently used. Each tool produces different patterns and textures. Experimenting with tool combinations achieves a unique French Country look.
Surface Preparation for French Country Walls
Proper surface preparation is essential for a flawless French Country finish. Smooth, clean walls provide a stable base for texture materials to adhere properly.
Repair any cracks, holes, or imperfections before applying texture. Sand uneven areas and remove dust to prevent materials from peeling or bubbling. Priming the surface also improves adhesion and ensures consistent color andtexture application.
Cleaning the Surface
Remove dust, grease, and loose debris from walls. A clean surface ensures better adhesion and prevents imperfections. Use a mild detergent solution and allow the wall to dry completely.
Repairing Imperfections
Patch holes and cracks using a lightweight joint compound. Sand repairs are smooth for an even base. Minor imperfections can be incorporated into the texture, but major flaws must be fixed.
Priming Walls
Use a primer suitable for textured finishes. Priming enhances adhesion and improves color consistency. Some textured paints may include primer, but an additional coat is often recommended.
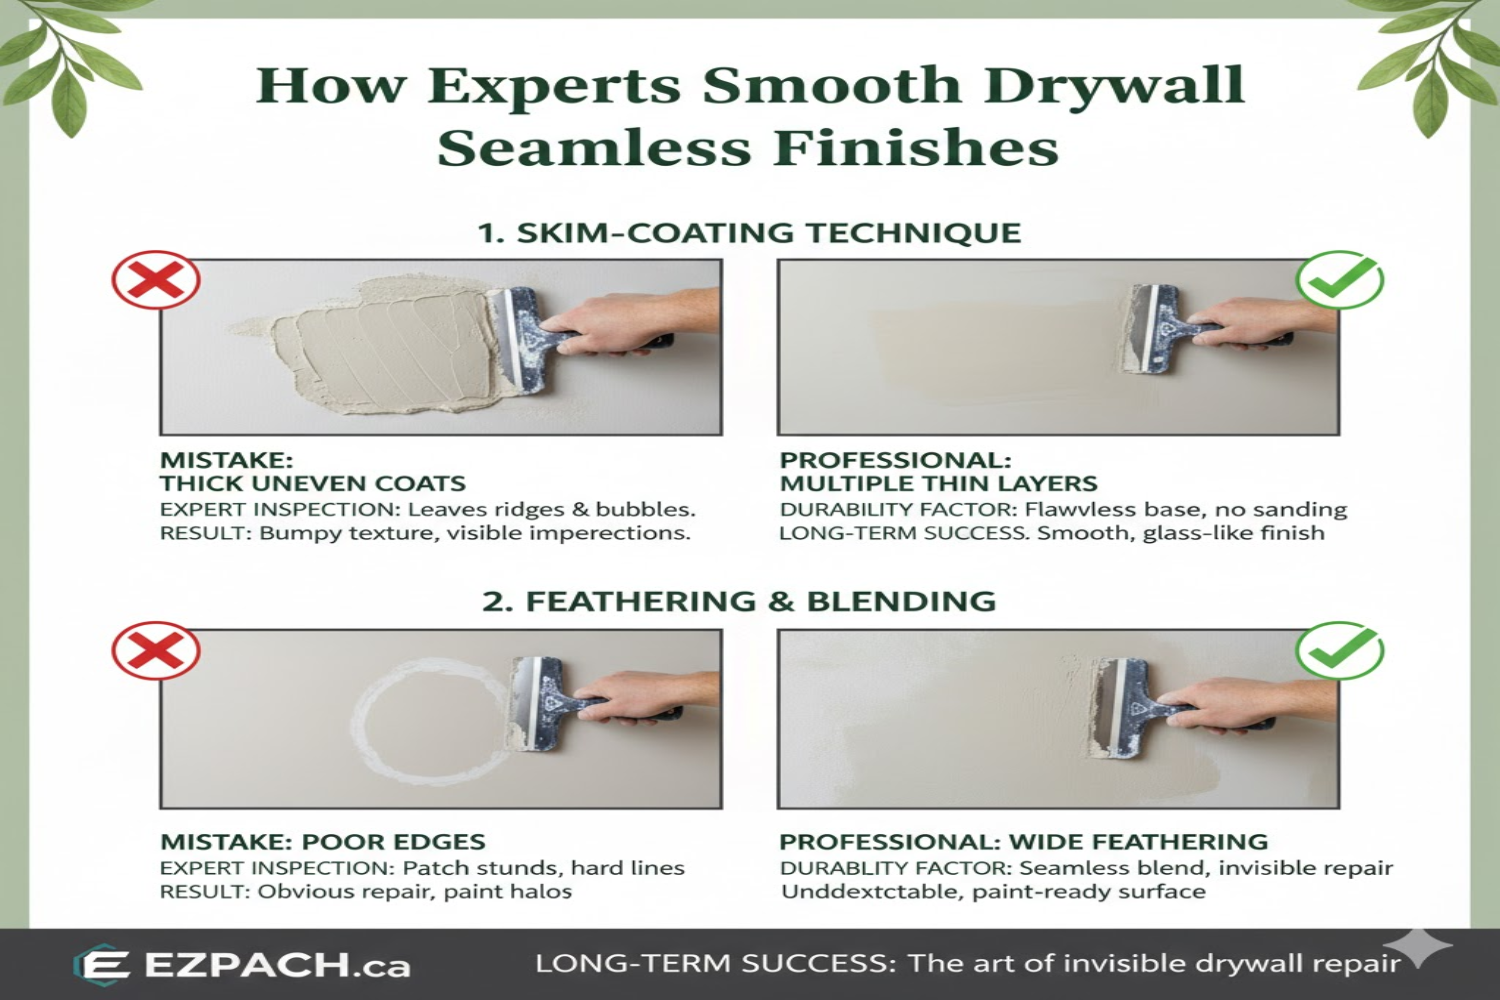
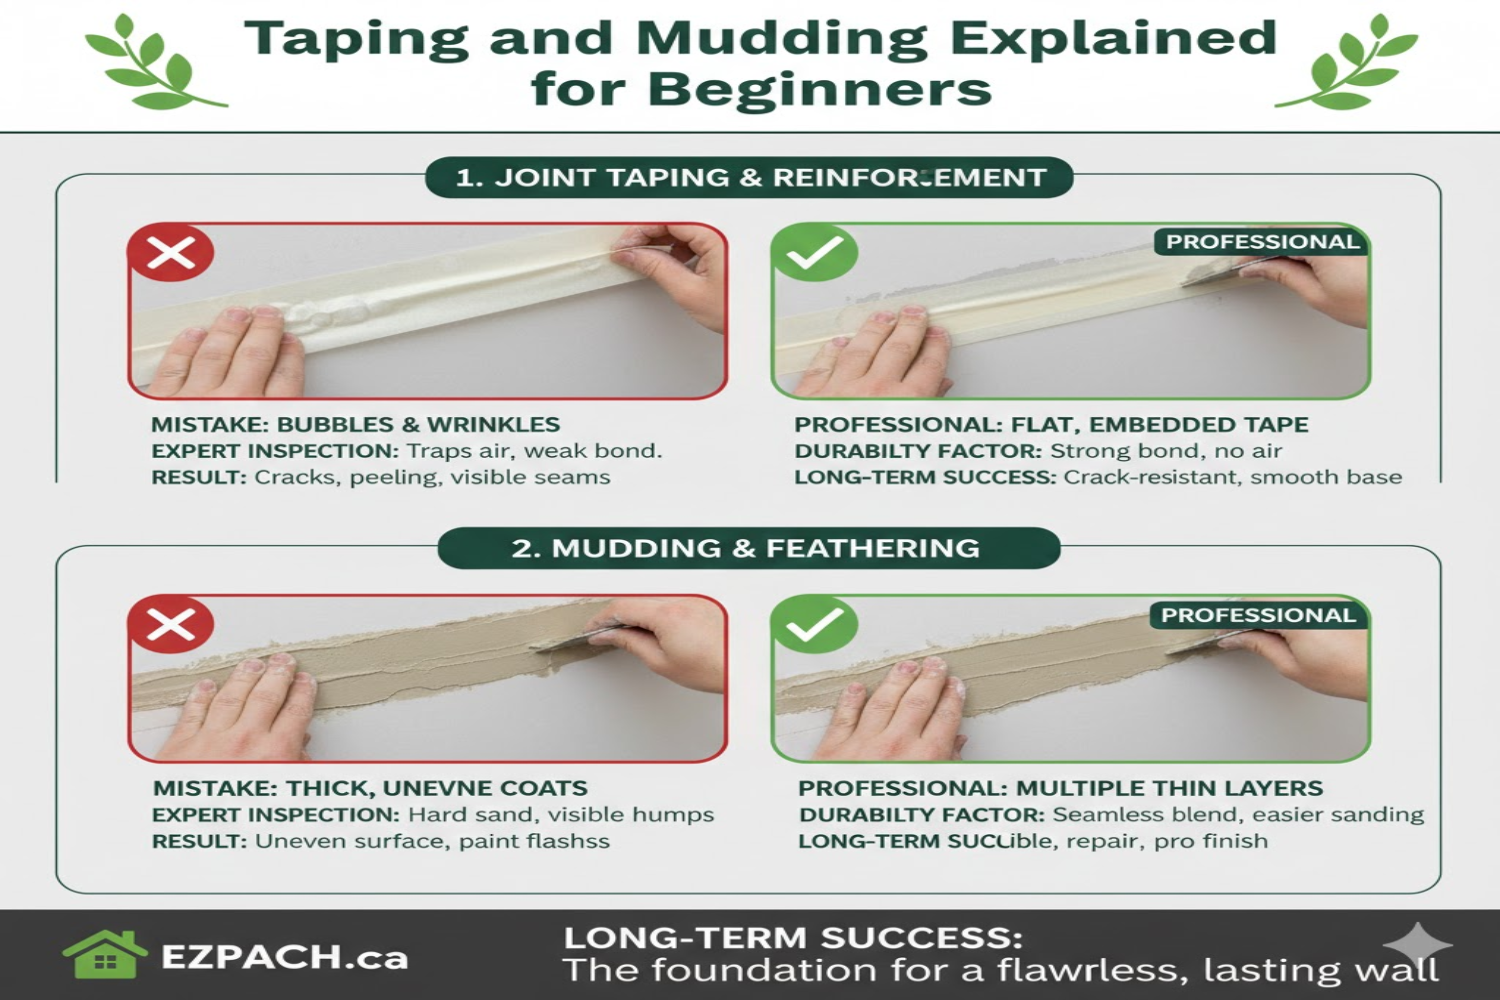
Application Techniques for French Country Texture
Applying French Country texture involves layering, blending, and manipulating materials to achieve the desired look. The process typically includes spreading, troweling, and finishing with sponges or brushes for effect.
The key is to create a controlled irregularity that mimics the natural, rustic charm of French Country interiors. Practicing on sample boards or small wall areas helps develop a feel for the materials and tools.
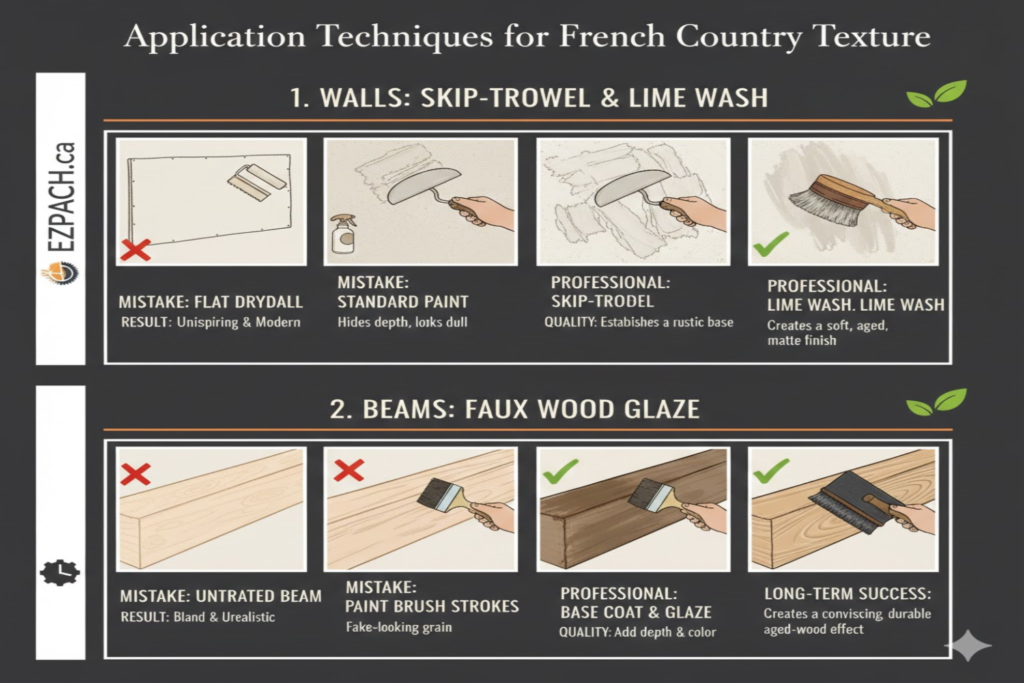
Trowel Application
Trowels spread plaster or joint compound evenly. Vary pressure and angle to produce subtle ridges and patterns. Smooth or overlapping strokes create depth and dimension.
Sponge and Brush Techniques
Sponges and brushes add texture and break uniformity. Dabbing or swirling motions mimic natural stone or plaster finishes. Experimenting with different tools creates a unique, artistic look.
Layering and Blending
Apply multiple layers of compound for a richer texture. Blend edges to avoid harsh lines and achieve seamless transitions. Layering also allows for color washes or glazes between coats.
Color and Finishing Techniques
Color and finish significantly impact the overall French Country effect. Soft, muted tones such as creams, beiges, and pastel shades are commonly used. Glazes or washes can accentuate texture and create the appearance of aged plaster.
Combining multiple shades adds depth and interest. Protective topcoats seal the surface, enhancing durability while maintaining the rustic, elegant appeal.
Choosing Colors
Natural, muted colors complement the rustic aesthetic. Lighter tones highlight texture patterns and reflections. Accent walls may feature deeper shades to create contrast and focus.
Glazing and Washes
Glazes or color washes enhance texture definition. Apply lightly with a brush or sponge for subtle variation. Multiple passes create layered depth without overpowering the base color.
Protective Topcoats
Seal finishes with matte or satin clear coats. Topcoats improve durability and prevent wear or staining. Avoid glossy finishes unless a specific effect is desired.
Common Mistakes to Avoid
Even with experience, several mistakes can undermine the French Country texture. Common issues include overworking the material, uneven layering, or poor surface preparation.
Rushing the process or neglecting drying times often results in cracks, peeling, or inconsistent finishes. Planning each step carefully and allowing proper curing ensures a lasting, professional result.
Overworking Material
Excessive troweling or brushing flattens textures. Stop once the desired irregularity is achieved. Practice restraint to maintain the natural French Country look.
Ignoring Drying Times
Layering too quickly prevents proper adhesion. Each coat must dry completely before the next application. Use a timer or follow manufacturer recommendations for best results.
H3: Skipping Preparation
Failing to clean, patch, or prime walls causes peeling or uneven texture. Proper prep is more important than technique alone. Investing time up front ensures the finish lasts for years.
Tips for Maintaining French Country Walls
Maintaining French Country walls is essential to preserving their textured beauty and rustic charm. Regular care prevents dust buildup, staining, and deterioration while keeping the wall finish vibrant and long-lasting. With proper maintenance, these walls can retain their elegant, aged appearance for many years.
Maintenance Tips for French Country Walls:
- Regular Dusting: Use a soft cloth, feather duster, or vacuum with a brush attachment to remove surface dust.
- Gentle Cleaning: Wipe walls lightly with a damp sponge or soft cloth; avoid harsh chemicals that can damage the texture.
- Avoid Excess Moisture: Keep bathrooms and kitchens well-ventilated to prevent humidity from affecting the walls.
- Protect High-Traffic Areas: Use corner guards or furniture pads to prevent accidental dents or scratches.
- Touch-Up Patching: Repair minor chips or cracks promptly using matching compound and color to blend with the existing texture.
- Sealant Reapplication: Periodically apply a protective topcoat or wax to maintain durability and ease of cleaning.
Key Tips & Techniques for French Country Texture
- Choose the Right Materials: Use plaster, joint compound, or specialty paints suitable for texture.
- Prepare Surfaces Carefully: Clean, patch, sand, and prime walls before applying texture.
- Select Appropriate Tools: Trowels, sponges, and brushes create different pattern effects.
- Apply Layers Gradually: Build up texture in multiple coats for depth and variation.
- Use Glazes or Washes: Enhance depth with color washes for an aged, rustic look.
- Allow Adequate Drying: Proper curing prevents cracks and peeling.
- Seal Finished Walls: Apply topcoat for durability and protection.
- Avoid Overworking: Control movement to maintain the natural irregularity.
FAQs
Q1: Can beginners achieve French Country texture?
A1: Yes, with practice and proper tools, beginners can create professional-looking results.
Starting on small walls or sample boards helps build confidence.
Q2: How long does it take for the texture to dry completely?
A2: Drying time varies depending on the material and thickness.
Typically, 24–48 hours per coat is recommended for full curing.
Q3: Can French Country texture be painted over?
A3: Yes, light touch-ups or color changes are possible using compatible paints.
Avoid heavy coats that may fill in the texture.
Q4: Is French Country texture durable in high-traffic areas?
A4: Properly applied and sealed finishes are durable.
Protective topcoats enhance resistance to wear and staining.
Q5: Can I create the texture on ceilings?
A5: Yes, with lighter compound layers to prevent sagging.
Specialized trowel techniques make ceiling application easier.
Q6: Do I need professional tools for the texture?
A6: Basic tools like trowels and sponges are sufficient.
Specialty rollers or brushes can enhance effects, but are optional.
Q7: Can I combine French Country texture with other finishes?
A7: Yes, combining with stone, wood, or wallpaper accents adds dimension.
Layering textures creates unique, personalized spaces.
Q8: How do I repair damaged textured walls?
A8: Patch using the same material and pattern, then blend carefully.
Touch-ups may require glazing to match surrounding textures.
Conclusion
French Country texture brings timeless elegance and rustic charm to any interior. Mastering the tips and techniques for French Country texture ensures that walls are visually appealing, durable, and full of character. Proper preparation, careful application, and finishing touches are essential to achieving professional results.
Maintaining these textured walls requires gentle cleaning, protective coatings, and occasional touch-ups. By following these guidelines, homeowners can enjoy the warmth and sophistication of French Country interiors for years while preserving the artistic integrity of their textured walls.
Drywall Repair Halifax
EZ Patch offers clean, professional drywall, ceiling, plaster, and water damage repair services in Halifax with minimal mess and long-lasting results.
EZ Patch – Drywall Repair Experts
Trusted drywall repair professionals serving Halifax and nearby areas.
Drywall Patch & Repair
Seamless drywall repairs for holes, cracks, dents, and damaged walls.
Ceiling Repairs
Professional ceiling repair services for stains, cracks, and water damage.
Drywall Installation
Complete drywall installation services for renovations and new builds.
Taping & Mudding
Smooth, paint-ready wall finishes by expert drywall finishers.
Plaster Repair Experts
Precision plaster repair services while maintaining original wall texture.
Water Damage Repair
Drywall and ceiling restoration for properties affected by water damage.
Texture Matching
Accurate texture blending so repaired areas match existing finishes.
Installation, Repair & Removal
End-to-end drywall installation, repair, and removal solutions.