Drywall installation is one of the most important stages in both residential and commercial construction. It creates the smooth wall and ceiling surfaces that define interior spaces and prepare them for finishing touches like paint or wallpaper. Understanding drywall installation step-by-step helps homeowners, contractors, and renovators set realistic expectations about timelines, costs, and outcomes.
Knowing what to expect during drywall installation step-by-step also reduces stress and prevents common mistakes. From preparation and framing inspection to finishing and cleanup, each phase plays a critical role in the final result. This guide explains every stage in detail, helping you understand the complete drywall installation process from start to finish.
Preparing the Space for Drywall Installation
Before drywall sheets are ever lifted into place, proper preparation is essential. This stage sets the foundation for a smooth installation and long-lasting results. Skipping preparation often leads to visible flaws and costly rework.
The space must be cleared, measured, and inspected to ensure it is ready for drywall. Any issues with framing, wiring, or insulation should be resolved before installation begins. Proper preparation saves time and ensures better finishing later.
Clearing the Work Area
Furniture, debris, and unnecessary materials should be removed from the space. Clear access allows installers to move drywall sheets safely and efficiently. A clean workspace also reduces the risk of damage to new drywall.
Inspecting Wall Framing
Studs and joists must be straight, properly spaced, and securely fastened. Uneven framing can cause drywall to bow or crack over time. Any damaged or misaligned framing should be corrected before proceeding.
Checking Electrical and Plumbing
Electrical wiring, outlets, and plumbing lines must be installed and inspected prior to drywall. Making changes after drywall installation is expensive and time-consuming. This step ensures everything is safely positioned and code-compliant.
Measuring and Planning Drywall Layout
Accurate measurements are critical for minimizing waste and ensuring clean seams. Drywall installation step-by-step always includes a detailed layout plan before cutting begins. Planning also improves efficiency and reduces material costs.
Installers typically plan sheet placement to minimize seams and avoid small, awkward pieces. This results in a stronger wall and a smoother finished appearance.
Calculating Sheet Requirements
Room dimensions are measured carefully to determine how many drywall sheets are needed. Ceiling height, wall length, and cutouts for doors or windows are factored in. Accurate calculations prevent over-purchasing materials.
Planning Seam Placement
Seams are ideally placed away from high-visibility areas. Horizontal seams are often preferred for walls because they reduce cracking. Proper planning improves structural strength and aesthetics.
Accounting for Waste
Extra drywall is typically added to the estimate to account for mistakes or future repairs. This buffer ensures the project stays on schedule. Smart planning reduces unnecessary expenses.
Cutting Drywall Sheets to Size
Once measurements are finalized, drywall sheets are cut to fit the space. Precision is crucial during this step to ensure tight joints and clean edges. Poor cuts can lead to gaps that require extra finishing work.
Cutting drywall involves scoring the surface and snapping the panel cleanly. Openings for outlets, switches, and fixtures must be accurately marked and cut.
Scoring and Snapping Technique
A utility knife is used to score the drywall face paper. The sheet is then snapped along the score line for a clean break. This technique ensures straight, controlled cuts.
Cutting Openings
Electrical boxes and vents are carefully measured and marked. Drywall saws or rotary tools are used for precise openings. Accuracy prevents loose fits and finishing problems.
Trimming Rough Edges
Rough edges are smoothed with a rasp or sanding tool. Clean edges allow sheets to sit flush against each other. This step improves joint strength and appearance.
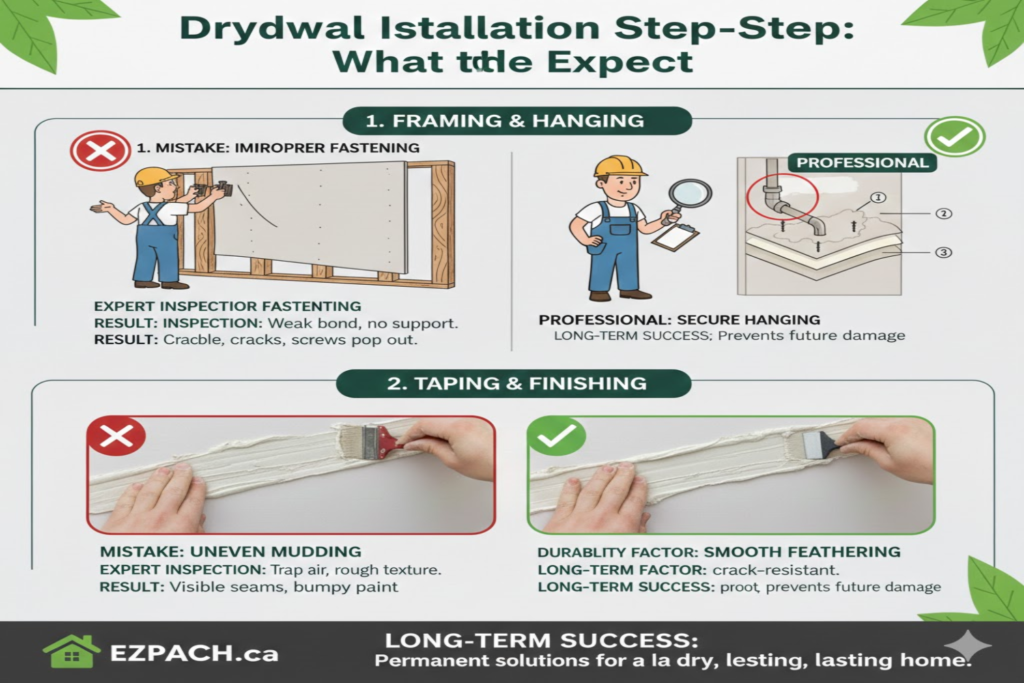
Installing Drywall on Ceilings
Ceilings are typically installed before walls during the drywall installation step-by-step. This allows wall panels to support ceiling edges and create stronger joints. Ceiling installation requires careful handling due to gravity and weight.
Drywall sheets are lifted into place and secured to ceiling joists. Proper spacing and fastening patterns are essential to prevent sagging over time.
Lifting and Positioning Sheets
Drywall lifts or additional workers are often used to position ceiling panels. Proper alignment ensures straight seams. This reduces strain and improves accuracy.
Fastening to Joists
Screws are driven into joists at consistent intervals. Overdriving screws can damage the drywall, while underdriving reduces holding power. Correct technique ensures long-term stability.
Avoiding Ceiling Sag
Using an appropriate drywall thickness prevents sagging. Moisture-resistant drywall may be required in certain areas. Proper installation preserves ceiling integrity.
Installing Drywall on Walls
After the ceilings are complete, wall drywall installation begins. This phase creates the visible surfaces of rooms and hallways. Careful alignment and fastening are key to professional results.
Wall sheets are typically installed horizontally or vertically, depending on the room layout. Consistency improves joint strength and finishing efficiency.
Bottom Row Installation
The bottom row is installed first, leaving a small gap above the floor. This gap prevents moisture absorption. Baseboards later cover the gap.
Upper Row Placement
Upper sheets are placed tightly against ceiling panels. Proper spacing ensures strong joints. Accurate placement reduces cracking risks.
Securing to Wall Studs
Drywall screws are placed along studs at regular intervals. Proper screw depth prevents surface damage. Consistent fastening ensures durability.
Fastening Techniques and Best Practices
Fastening drywall correctly is a critical step in the drywall installation step-by-step. Improper fastening leads to nail pops, cracks, and loose panels. Using the right tools and techniques ensures long-lasting results.
Screws are preferred over nails for better holding power. Consistent spacing improves structural integrity.
Screw Spacing Guidelines
Screws are typically spaced 12 to 16 inches apart. Edges require closer spacing than field areas. Following guidelines prevents movement.
Correct Screw Depth
Screws should slightly dimple the drywall surface without tearing the paper. Overdriving weakens the panel. Proper depth ensures secure attachment.
Avoiding Common Mistakes
Missing studs or uneven spacing causes instability. Careful attention during fastening prevents future repairs. Quality control matters.
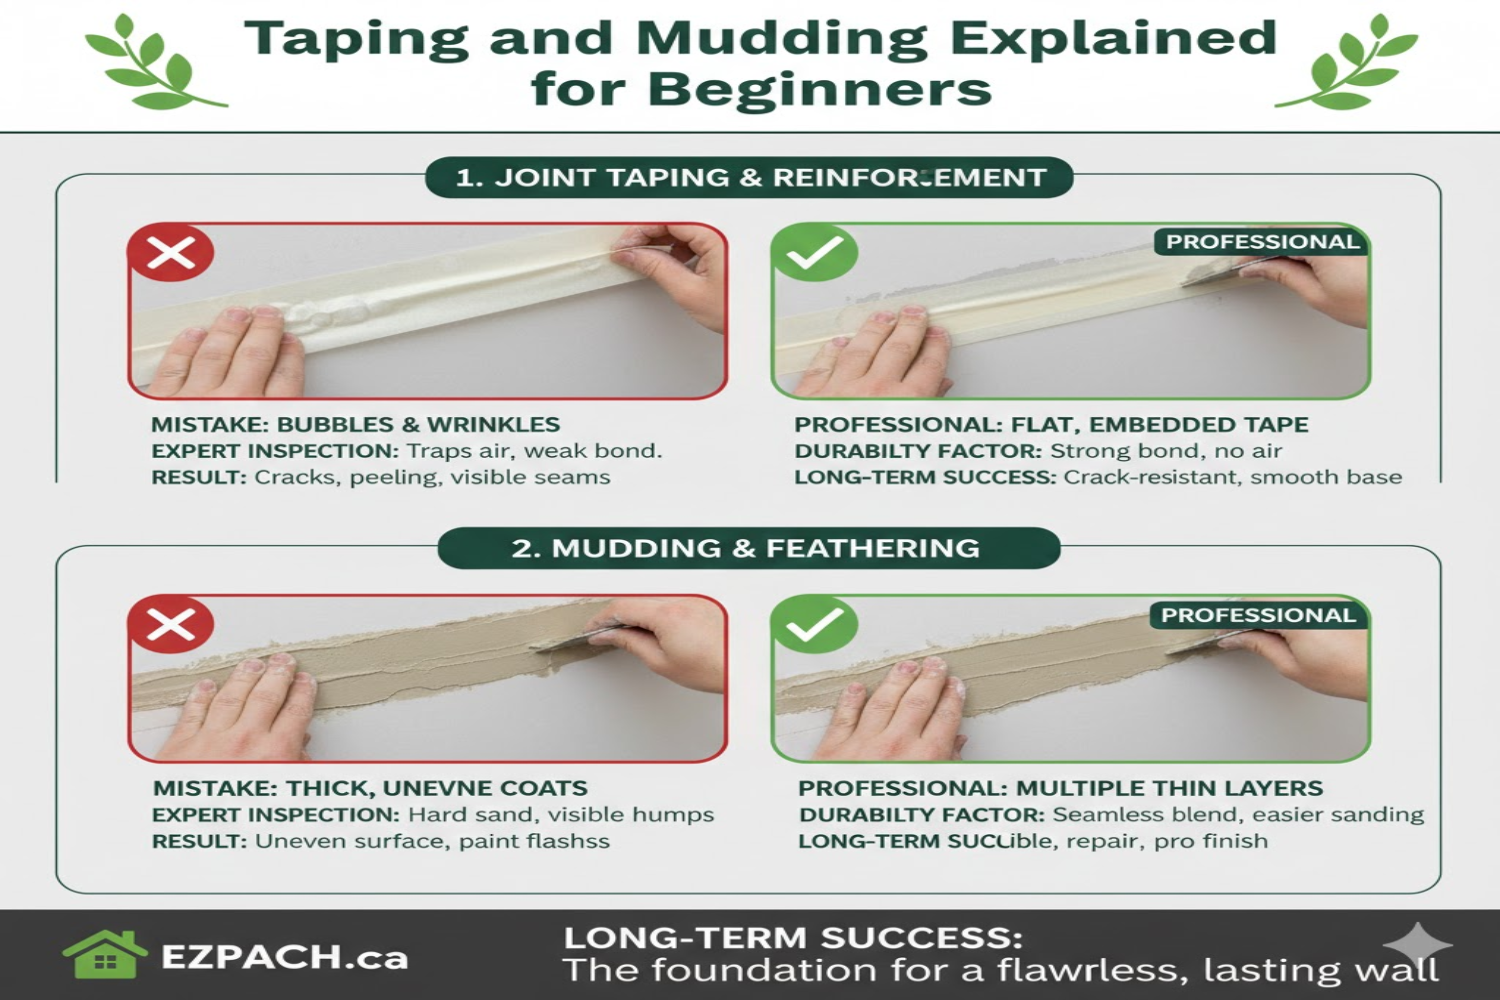
Taping and Joint Compound Application
Once drywall is installed, seams and fasteners must be concealed. This step transforms raw panels into smooth walls. Proper taping and mudding are essential for a flawless finish.
Joint compound is applied in layers over seams, corners, and screw heads. Drying time between coats is critical.
Applying Drywall Tape
Tape reinforces seams and prevents cracking. Paper tape offers strength, while mesh tape is easier for beginners. Proper embedding ensures durability.
First Coat of Joint Compound
The first coat fills gaps and secures tape. Thin, even application prevents bubbles. This layer sets the foundation for smooth finishing.
Additional Coats
Multiple coats are applied to feather edges. Each layer is sanded lightly after drying. Gradual buildup creates invisible seams.
Sanding and Surface Smoothing
Sanding is essential to achieve a paint-ready surface. This step removes ridges and imperfections from dried joint compound. Patience and precision are key.
Fine-grit sandpaper is used to avoid damaging drywall paper. Proper lighting helps identify uneven areas.
Hand Sanding Techniques
Hand sanding allows greater control over small areas. It minimizes over-sanding. This method is ideal for detailed work.
Pole Sanding for Large Areas
Pole sanders reach high walls and ceilings. They improve efficiency. Controlled pressure prevents surface damage.
Dust Control Measures
Drywall dust is fine and pervasive. Using dust masks and containment methods protects health. Cleanup is easier with prevention.
Priming and Painting Preparation
Before painting, drywall must be properly primed. Primer seals the surface and ensures even paint absorption. Skipping this step leads to blotchy finishes.
Priming also reveals any remaining imperfections. Final touch-ups are done before painting begins.
Choosing the Right Primer
Drywall-specific primers provide the best results. They improve paint adhesion. Proper primer selection enhances durability.
Inspecting Finished Surfaces
Walls are inspected under good lighting. Imperfections are corrected. Attention to detail ensures quality results.
Final Touch-Ups
Small flaws are patched and sanded. Final preparation ensures a smooth paint job. This step completes installation readiness.
Cleanup and Post-Installation Inspection
Cleanup is the final stage of the drywall installation step-by-step. Removing dust and debris ensures a safe and clean environment. Proper inspection confirms work quality.
Installers check seams, corners, and fasteners for consistency. Final approval ensures readiness for finishing.
Removing Debris
Scraps and dust are collected and disposed of. Clean spaces improve safety. Proper disposal follows local regulations.
Final Walkthrough
Walls and ceilings are inspected thoroughly. Any issues are addressed immediately. This ensures client satisfaction.
Preparing for Next Trades
Once drywall is complete, painting or flooring can begin. Clear scheduling prevents delays. Coordination ensures smooth project flow.
Common Tools Used During Installation
Having the right tools ensures efficient drywall installation. Quality tools improve accuracy and reduce fatigue.
- Utility knife
- Drywall screw gun
- Taping knives
- Sanding blocks or poles
- Drywall lift
Conclusion
Understanding drywall installation step-by-step helps homeowners and contractors prepare for a smooth and successful project. Each stage, from preparation and cutting to finishing and cleanup, contributes to the final quality of the walls. Knowing what to expect reduces surprises and ensures better communication with installers.
By following proper techniques and allowing adequate time for each phase, drywall installation results in durable, visually appealing interiors. Investing in skilled labor and quality materials ensures long-lasting performance. A well-installed drywall system forms the foundation for beautiful, functional spaces.
Frequently Asked Questions (FAQs)
1. How long does drywall installation usually take?
Installation time depends on room size and complexity. Most residential projects take several days including finishing.
2. Can drywall be installed over existing walls?
Yes, drywall can be installed over existing surfaces if the framing is sound. This method is often used in renovations.
3. Is drywall installation noisy?
Some noise is expected during cutting and fastening. However, it is generally manageable and temporary.
4. Does drywall installation require permits?
Permits depend on local regulations and project scope. Structural changes usually require approval.
5. Can drywall be installed in cold weather?
Yes, but temperature and humidity must be controlled. Proper conditions ensure compound cures correctly.
6. How thick should drywall be for walls?
Standard walls typically use ½-inch drywall. Thicker panels may be required for fire-rated assemblies.
7. What causes visible seams after installation?
Poor taping or insufficient sanding causes visible seams. Proper finishing techniques prevent this issue.
8. Is professional installation worth the cost?
Professional installers ensure speed, quality, and durability. DIY installation may save money, but it requires skill.
Drywall Repair Halifax
EZ Patch offers clean, professional drywall, ceiling, plaster, and water damage repair services in Halifax with minimal mess and long-lasting results.
EZ Patch – Drywall Repair Experts
Trusted drywall repair professionals serving Halifax and nearby areas.
Drywall Patch & Repair
Seamless drywall repairs for holes, cracks, dents, and damaged walls.
Ceiling Repairs
Professional ceiling repair services for stains, cracks, and water damage.
Drywall Installation
Complete drywall installation services for renovations and new builds.
Taping & Mudding
Smooth, paint-ready wall finishes by expert drywall finishers.
Plaster Repair Experts
Precision plaster repair services while maintaining original wall texture.
Water Damage Repair
Drywall and ceiling restoration for properties affected by water damage.
Texture Matching
Accurate texture blending so repaired areas match existing finishes.
Installation, Repair & Removal
End-to-end drywall installation, repair, and removal solutions.