Drywall finishing is one of the most important steps in achieving professional-looking walls and ceilings. Even minor errors during finishing can leave visible seams, bumps, or uneven textures. Learning drywall finishing mistakes to avoid helps homeowners and DIY enthusiasts save time, reduce repair costs, and achieve a flawless finish.
Many people rush through the finishing process, thinking it is a quick step before painting. However, improper techniques can cause long-term issues that are expensive to fix. Understanding drywall finishing mistakes to avoid ensures smoother surfaces, longer-lasting results, and a higher-quality appearance for any room.
Drywall Finishing Mistakes in Surface Preparation
Proper surface preparation is the foundation of quality drywall finishing. Skipping cleaning, inspection, or priming often leads to adhesion issues and visible defects. Many homeowners fail to notice dust, debris, or minor imperfections, which become obvious after the paint. Understanding this step reduces the need for rework and ensures long-lasting results.
Neglecting prep work is one of the most common drywall finishing mistakes to avoid. Cleaning and inspecting the surface can prevent cracks, peeling, and uneven textures. Proper preparation also improves paint coverage and final appearance.
Inspecting the Drywall Surface
Before applying joint compound, check for holes, dents, and cracks. Surface flaws can worsen if patched incorrectly. Correct inspection prevents uneven layers and visible seams.
Cleaning Dust and Debris
Sanding and construction create fine dust on walls. If not removed, joint compound won’t adhere properly. Use a damp cloth or vacuum to remove all residue.
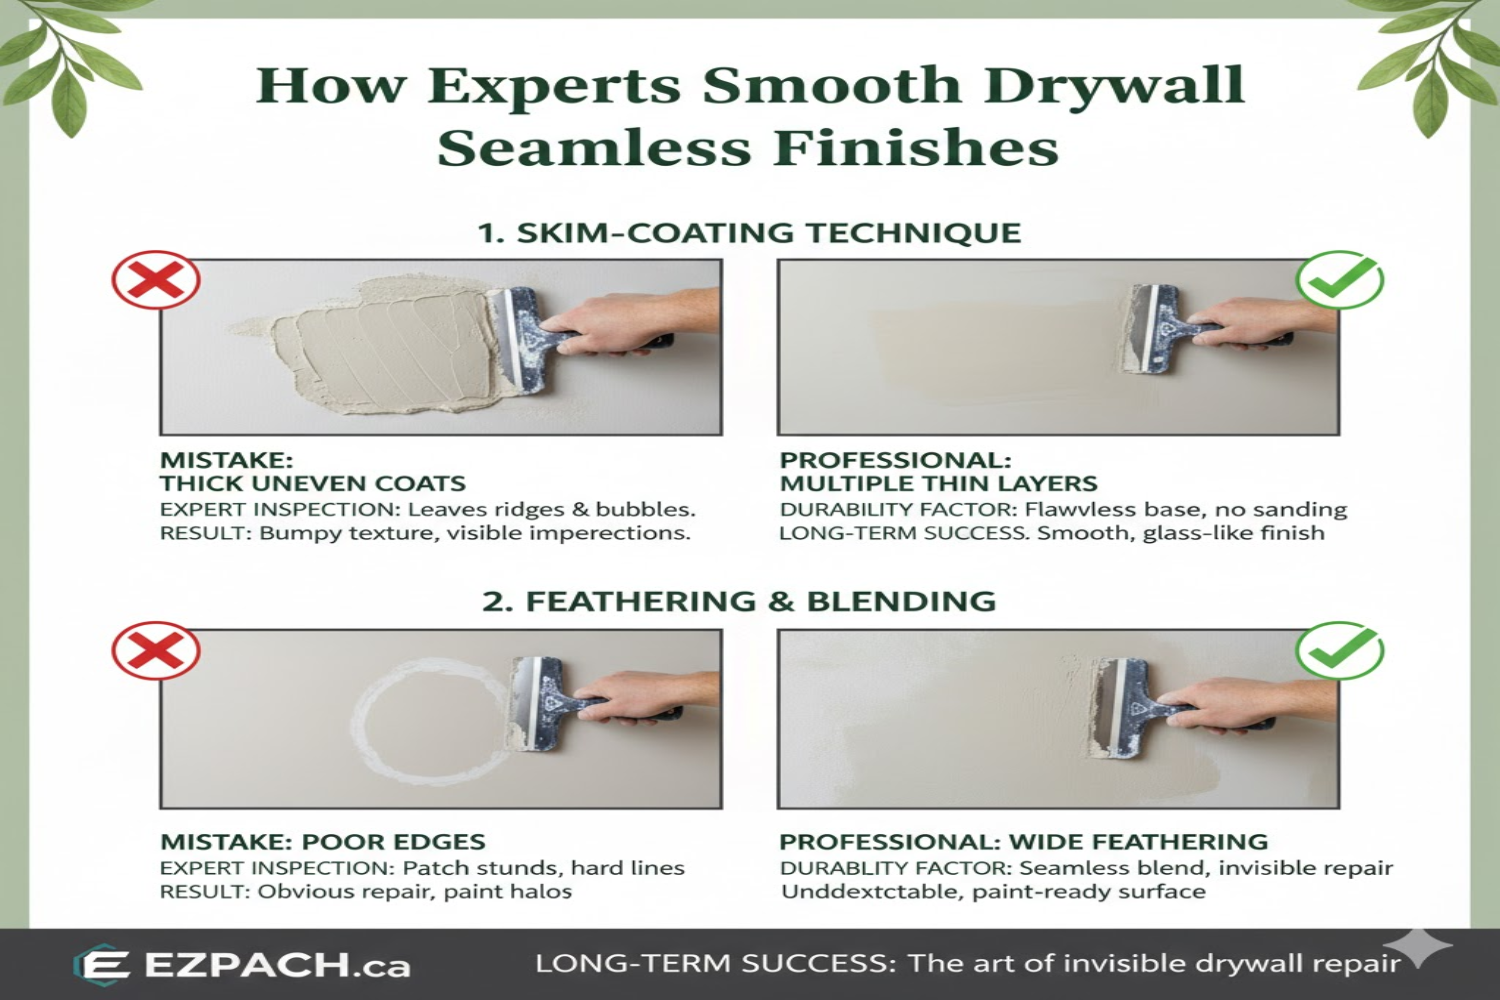
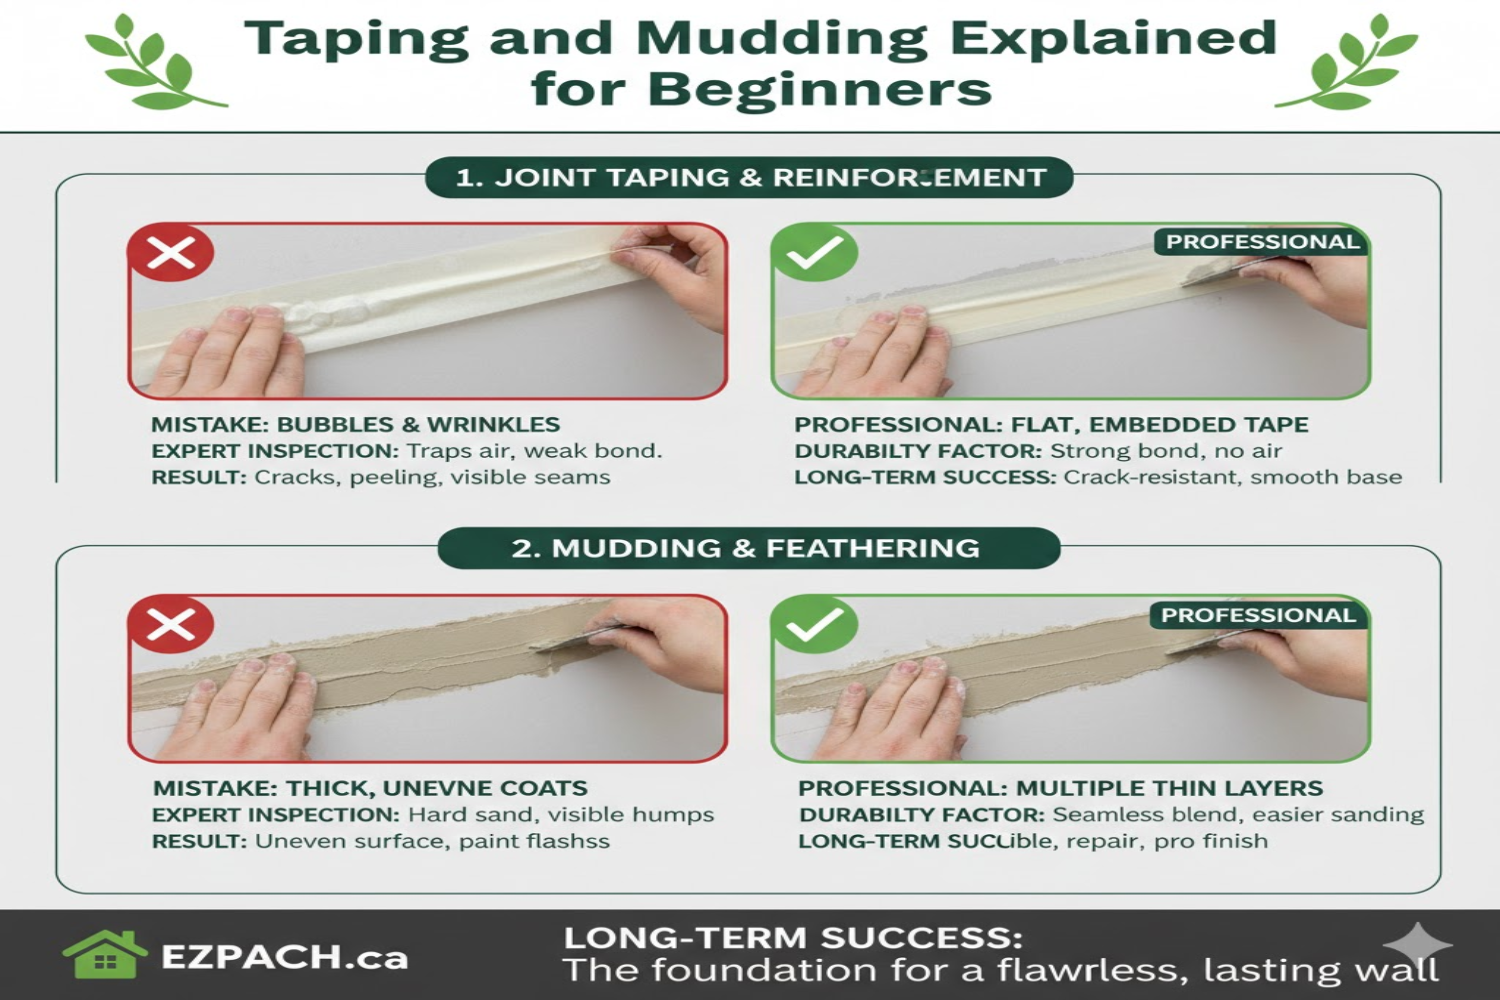
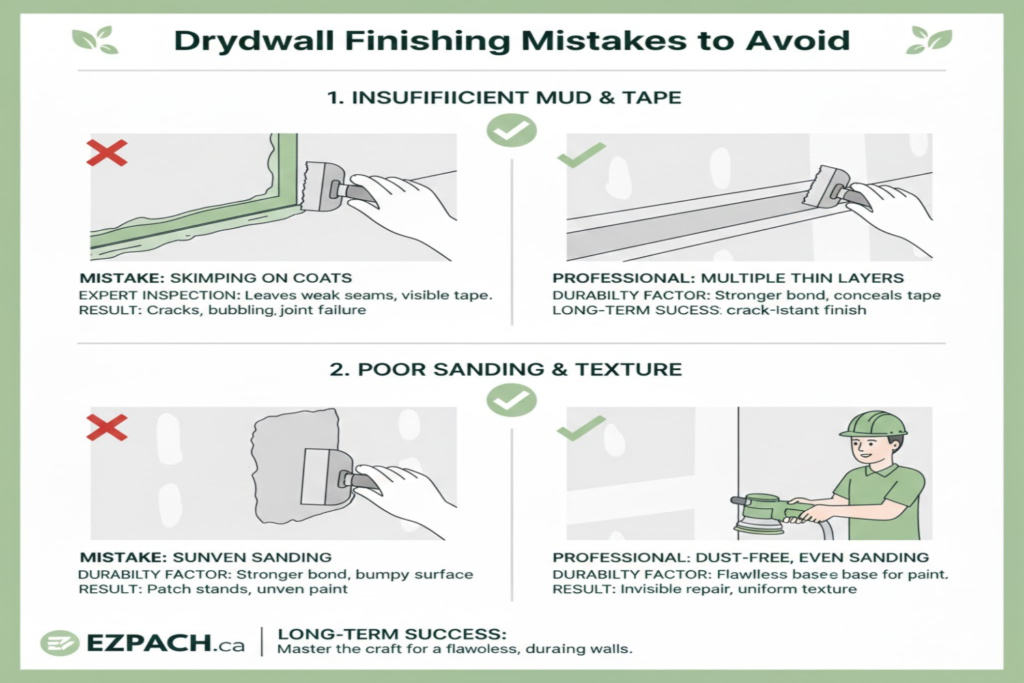
Mistakes in Applying Joint Compound
Applying too much or too little joint compound is a common drywall finishing mistake. Thick layers take longer to dry, crack easily, and create lumps. Thin layers may not fully cover seams, causing imperfections to show through paint.
Layering Techniques
Start with a base coat, embedding tape into wet compound. Apply two to three thin coats rather than one thick layer. Allow each coat to dry fully to prevent cracking.
Corner Compound Mistakes
Corners are highly visible and prone to bulging. Use corner tools for precise application. Avoid overloading the compound to maintain clean, straight lines.
Drywall Finishing Mistakes in Sanding
Sanding is a critical step, but it is often done incorrectly. Over-sanding can create dips, while under-sanding leaves bumps. Both affect the final finish and paint adhesion.
Proper sanding ensures a smooth, professional surface. Use fine-grit sandpaper (150–220) and sand in circular motions. Always remove dust after sanding for optimal results.
Key Sanding Tips:
- Sand each layer fully before adding the next
- Feather edges to blend seams
- Avoid pressing too hard to prevent gouges.
- Use sanding sponges for corners.
- Vacuum and wipe the surface before priming
Tape and Seam Drywall Finishing Mistakes
Incorrect taping is a major source of visible seams. Misaligned or wrinkled tape telegraphs after painting, creating unprofessional walls. Embedding tape properly and smoothing the compound reduces common errors.
Choosing the Right Tape
Paper tape is durable but needs careful embedding. Fiberglass mesh is easier for beginners but requires complete coverage. Proper tape selection reduces finishing mistakes.
Embedding and Smoothing
Apply the tape to the wet compound and smooth it evenly. Avoid air bubbles or folds. Use a wide taping knife to create a flush surface.
Checking for Gaps
Seams must slightly overlap at edges. Misaligned tape will become noticeable after painting. Inspect all joints before the compound dries.
Corner Drywall Finishing Mistakes to Avoid
Corners are highly visible and require precise finishing. Bulging corners, uneven compound, or skipped sanding are common drywall finishing mistakes to avoid.
Use corner tools to create straight lines. Feather edges carefully to blend with walls. Check corners under bright light to ensure smooth transitions.
Corner Tips:
- Apply thin compound coats
- Sand lightly between layers
- Use metal or plastic corner beads.
- Avoid overloading the compound
- Inspect for straightness before drying.
Drywall Finishing Mistakes Due to Rushing Drying
Rushing the drying process is a frequent error. Applying the next coat or sanding too soon causes peeling, cracking, or uneven texture. Drying time depends on compound thickness and humidity. Allow each layer to cure fully to prevent shrinkage and cracking. Using fans or dehumidifiers can safely speed drying.
Patience ensures a flawless finish and reduces rework. High-humidity environments need extra care. Improperly dried walls may bubble after painting. Always verify dryness before priming or painting. Understanding drying time prevents future drywall finishing mistakes.
Skipping Primer Before Painting
Primer ensures even paint coverage and proper adhesion. Skipping primer is one of the most costly drywall finishing mistakes. It can cause blotchy paint and highlight patched areas.
Use a quality primer to seal joint compound and drywall. Primer also reveals minor imperfections for final touch-ups.
Primer Benefits:
- Creates uniform paint absorption
- Reduces visible patches
- Enhances final finish
- Protects against moisture
- Improves paint durability
Low-Quality Tools Causing Drywall Finishing Mistakes
Cheap knives, sanders, and tape cause uneven finishes. Poor-quality tools increase frustration and repair work. Using professional-grade tools reduces the risk of common mistakes.
Invest in wide taping knives, fine-grit sandpaper, and proper corner tools. High-quality tools ensure smoother compound application and consistent results.
Tool Recommendations:
- Flexible taping knives
- Sanding sponges for corners
- Durable joint compound
- Corner tools
- Vacuum and cleaning brush
DIY vs Professional Drywall Finishing Mistakes and Cost Comparison
Sometimes DIY drywall finishing leads to repeated mistakes. Professionals reduce errors, but at a higher cost. Comparing the two approaches helps homeowners choose wisely.
Cost & Quality Table:
| Method | Cost Range | Common Mistakes | Quality & Longevity |
| DIY | $30–$100 | Over/under compound, sanding errors, tape misalignment | Moderate; may require touch-ups |
| Professional | $200–$700 | Minimal if any | High; smooth, durable, seamless finish |
Safety Mistakes in Drywall Finishing
Neglecting safety is common but dangerous. Dust inhalation, ladder falls, and chemical exposure occur often. Proper safety precautions prevent injuries.
Wear goggles, dust masks, and gloves. Ensure stable ladders and ventilate the area properly.
Safety Tips:
- Goggles for eye protection
- Dust mask or respirator
- Ladder stability
- Ventilate room
- Clear workspace
Conclusion
Avoiding drywall finishing mistakes ensures professional-looking, durable walls. Attention to preparation, application, and sanding is critical. Mistakes like skipping primer, rushing drying, or using low-quality tools reduce the finish quality.
Proper technique, patience, and inspection prevent costly rework. Investing in tools and following best practices enhances aesthetics and longevity. By understanding drywall finishing mistakes to avoid, homeowners achieve seamless results and save money in the long term.
FAQs
1. How do I avoid cracks after drywall finishing?
Use multiple thin layers of joint compound and embed tape properly. Allow each coat to dry fully.
2. Can I sand drywall too much?
Yes, excessive sanding can create indentations. Sand lightly and evenly for smooth walls.
3. Is primer necessary before painting?
Yes, primer ensures even paint coverage and seals the joint compound. Skipping it causes blotchy finishes.
4. What grit sandpaper is best for drywall finishing?
Use fine-grit sandpaper (150–220) for a smooth finish. Coarser grits leave scratches.
5. Can corners be finished like flat walls?
No, corners require special tools and careful feathering. Improper corners are highly visible.
6. Do low-quality tools affect the finish?
Yes, cheap knives and sanders create uneven surfaces and ridges. Quality tools improve results.
7. How long should each joint compound layer dry?
12–24 hours depending on thickness and humidity. Ensure full drying before sanding.
8. Should I hire a professional for minor holes?
DIY is fine for small holes, dents, and surface cracks. Large holes, structural damage, or water-damaged areas need professionals.
Drywall Repair Halifax
EZ Patch offers clean, professional drywall, ceiling, plaster, and water damage repair services in Halifax with minimal mess and long-lasting results.
EZ Patch – Drywall Repair Experts
Trusted drywall repair professionals serving Halifax and nearby areas.
Drywall Patch & Repair
Seamless drywall repairs for holes, cracks, dents, and damaged walls.
Ceiling Repairs
Professional ceiling repair services for stains, cracks, and water damage.
Drywall Installation
Complete drywall installation services for renovations and new builds.
Taping & Mudding
Smooth, paint-ready wall finishes by expert drywall finishers.
Plaster Repair Experts
Precision plaster repair services while maintaining original wall texture.
Water Damage Repair
Drywall and ceiling restoration for properties affected by water damage.
Texture Matching
Accurate texture blending so repaired areas match existing finishes.
Installation, Repair & Removal
End-to-end drywall installation, repair, and removal solutions.